
Adding Related Items
Related Items
Work items may have related items that can be linked. For example, when creating a project, you may want to link related risks in order to create a risk register.
You can do this by clicking the  ribbon action or by clicking the ' Add Related... ' link located within the Relations Panel.
Available relations may include (depending on module availability and profile settings): File, Customers, Reviewers, Resources, Cases, groups, Predecessors, Successors, job Titles, Time entries, Expense Sheets, Notes, and Topics.
Multiple relations are available for work items to view the different relations that are enabled, or enable other relations, done via the Settings > Layout page by you (or your Clarizen Admin user).
In the View settings for detailed object views, you can define whether to display empty panels when there are no related items. Click here for more details.
Adding Files
This page describes adding files to Clarizen items and includes the following sections:
- About Adding Files
- Adding Files to Grid Items
- Adding Files by Drag and Drop
- Adding Files via Data Preview
- Adding a Google Doc
- Adding a Webpage Link
- Adding a Box File or Folder
- Click here to learn about SharePoint
About Adding Files
Files of varying types can be added ('uploaded' or 'attached') to most Clarizen item types . Once they're added, files can be viewed via a File Viewer.
Clarizen currently enables uploading supported file types, limited to 100 MB per file (based on your storage capacity ), to a work item. Additionally Google Docs and Box stored files can also be assigned to work items.
Files can be added via the Add Related ribbon, located in the Relations Panel, by clicking the '+' on a Data Preview (available by clicking a  Quick Peek icon), or by dragging and dropping files directly onto an item.
Note:
Storage capacity is determined by the number of licensed user in the organization, for additional storage contact your Customer Success Manager.
Adding Files to Grid Items
- Select an item in the grid.
- Click
 and then
OR
In the Relations Panel, click the Add Related link (located at the panel's base) and click
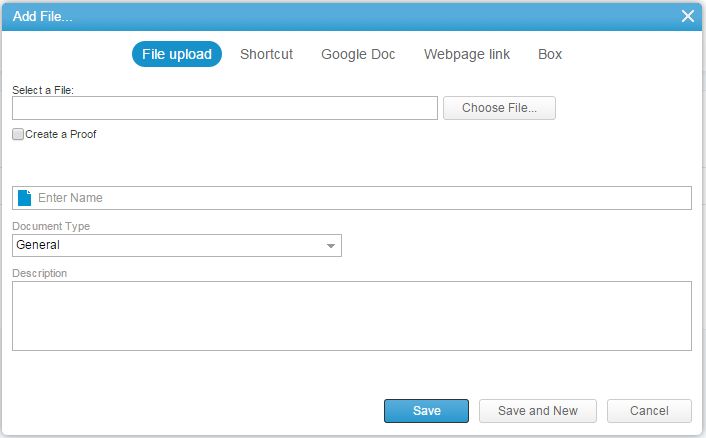
The Add File window opens.
Adding Existing Files
- Select the Existing tab to choose from files already uploaded into Clarizen
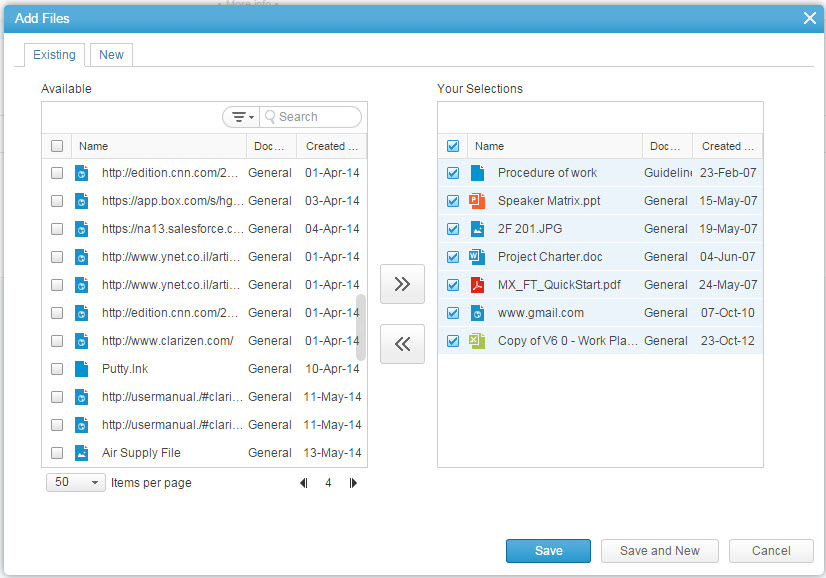
- Select the files you wish to attach and use the
 to make or remove your selection
Note:
Use the search field to quickly locate the desired files.
- Click

Uploading New Files
- Select the New tab to upload new files
See The Add File window above. - Click
 and browse to file you intend to add
Note:
If Digital proofing is enabled and you have active proofing licenses, you can Select the Create a Proof option to upload a proof file. See Creating and Managing Proofs for more details.
- Define the Name field
- Click
 to select a category for the Document Type field
 - Enter a description to the Description field (details to help locate files using the Global Search)
- Click

The data is sent to the server, a message confirms the action.

The file is added to the item.
OR
Click 
The data is sent to the server, a message confirms the action, t he file is added to the item and a blank Add File window opens, return to step 2.
Adding Files by Drag and Drop
Clarizen supports 'Drag-and-drop' for multiple files onto any item that supports a file link in the system directly from your computer onto the actual item.
Additionally, if the Relations Panel already contains a file subsection (pane), files can be dragged and dropped into that section.
Dragging and dropping a file automatically creates the file and link it to the relevant item.
Note:
This functionality can be disabled by your organization's Admin in the Files and Collaboration section of the System Settings.
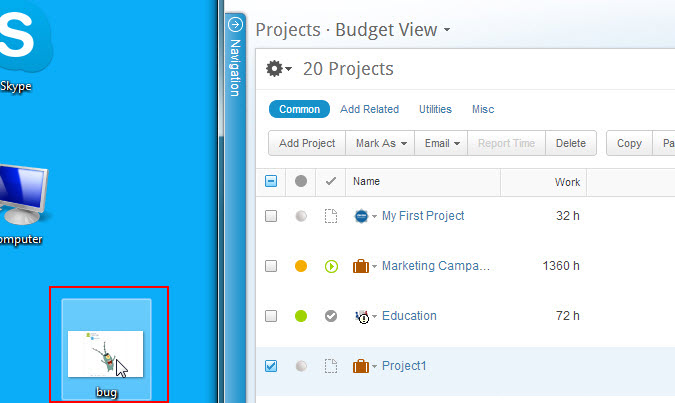
Figure 2: Click File
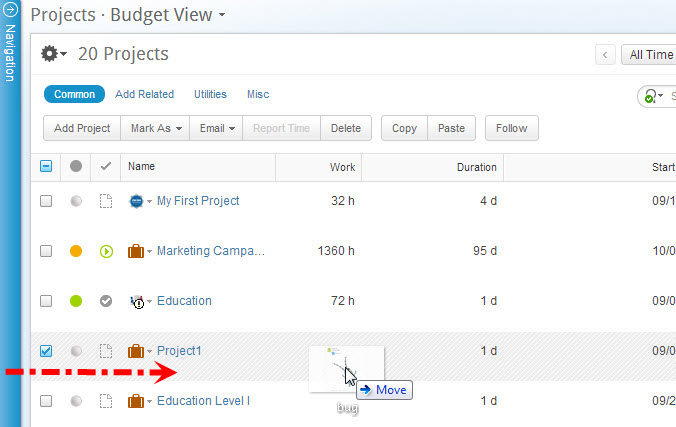
Figure 3: Drag and Drop to Item
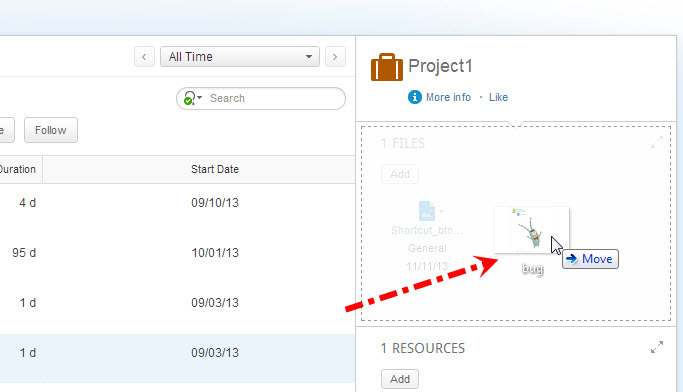
Figure 4: Drag and Drop to Relations Panel
Adding Files via Data Preview
- Navigate to a Data Preview via a Quick Peek.
- Click '+' located at the lower-left side of the preview window.
Figure 5: Add Related
The Add File window opens.
- Complete Steps 2 through 6 of the Uploading New Files procedure above.
The data is sent to the server, a message confirms the action, and the file is added to the item.
Adding a Google Doc
- Navigate to the Add File window via one of the methods described above.
- Click

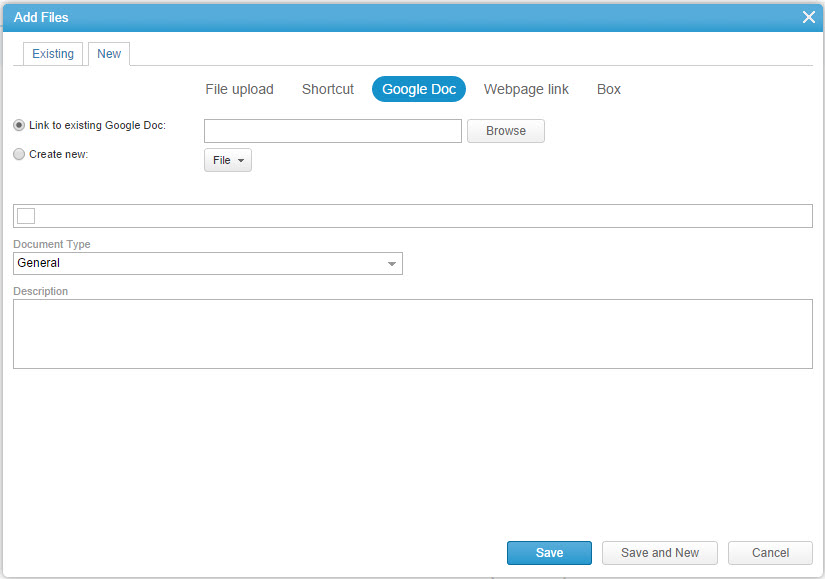
Figure 7: Define Google Doc
- Click
 to link an existing Google Doc
OR
Select the Create new radio button and click adjacent to File
 - Select the file type
- Complete Steps 3 through 6 of the Uploading New Files procedure above.
- The data is sent to the server, a message confirms the action, and the Google Docs file is added to the item
- All Google Doc files can be accessed via Google Drive.
Note:
Google Drive has two types of Office files: Documents created as a Google Doc and documents uploaded to Google Drive. Documents that have been uploaded to Google Drive cannot be edited.
Best Practices
For files that just need to be viewed, rather than edited, it is recommend to upload these files to Google Drive.
Files that need to be edited should be converted into Google Docs, as Google Drive does not support editing.
Note:
When converting to a Google Doc file you will have two unconnected files, the original uploaded file and the new converted Google Docs file.
Adding a Webpage Link
- Navigate to the Add File window via one of the methods described above.
- Click
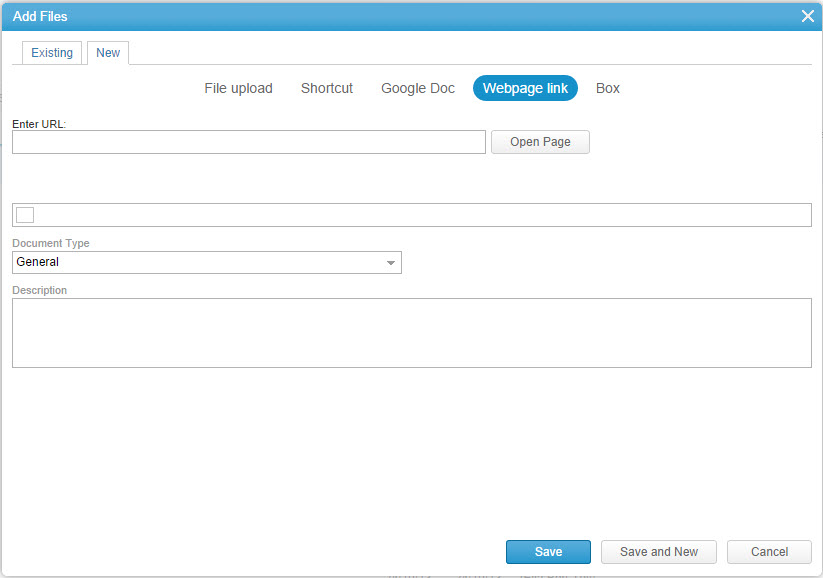
Figure 8: Define Webpage Link
- Enter (or 'paste') the full URL path .
- Complete Steps 3 through 5 of the Uploading New Files procedure above.
- The data is sent to the server, a message confirms the action, and the webpage link is added to the item.
Adding a Box File or Folder
- Navigate to the Add File window via one of the methods described above .
- Click

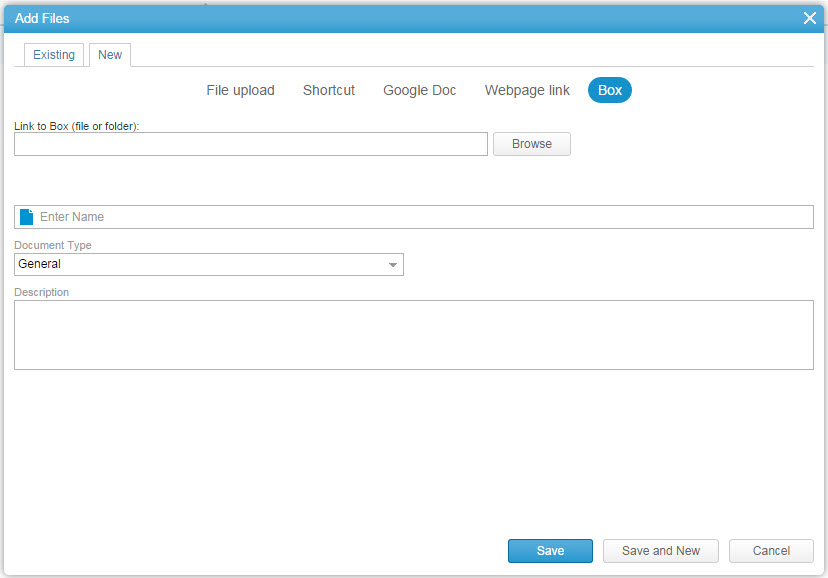
Figure 9: Define Box
- Click

The Choose a Box Doc find window opens.
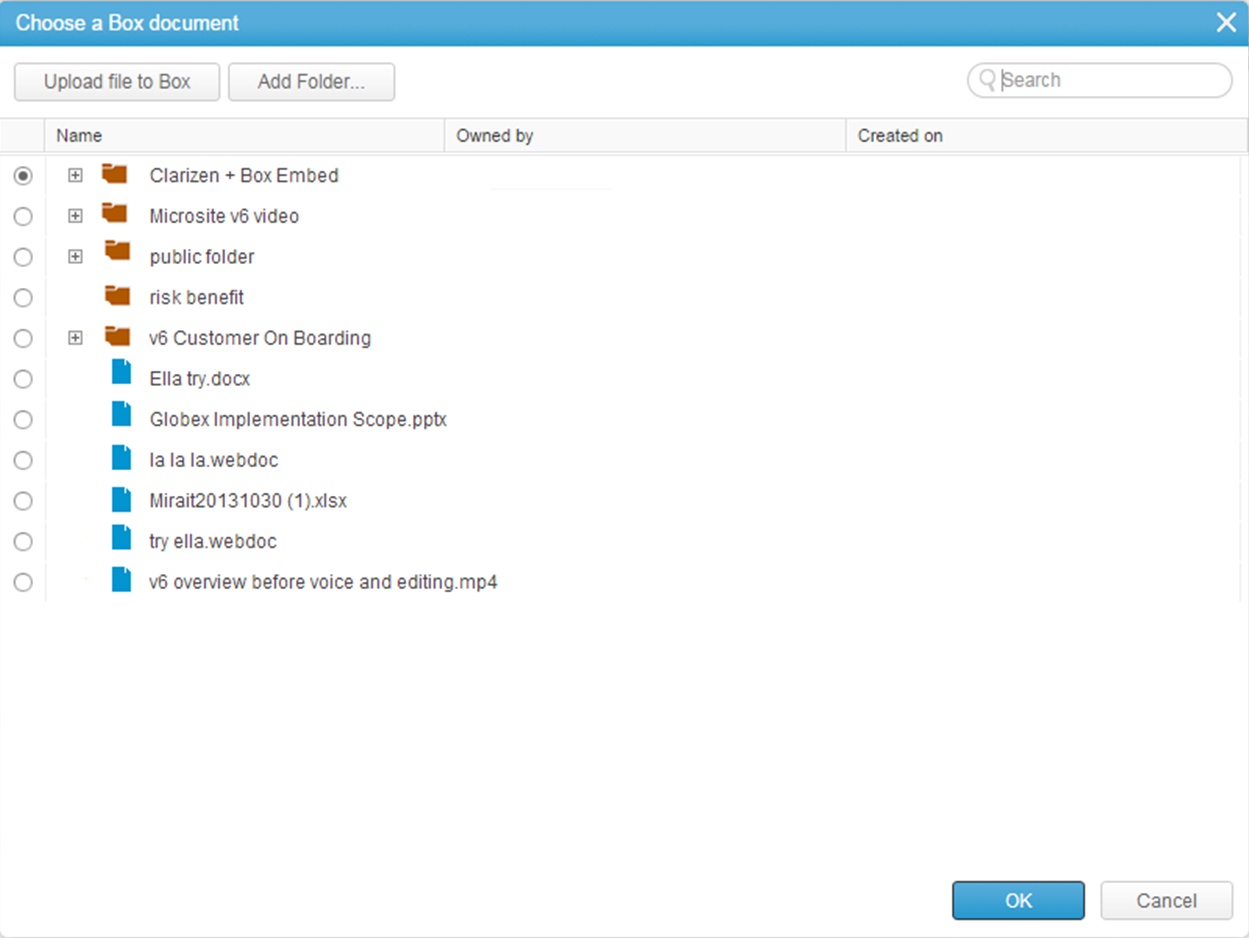
Figure 10: Choose Box Doc
- Select the intended Folder or File, create a new folder, or upload file to Box and click

Note:
You can use the search field to quickly locate the file you are looking for.
- Define the Name field.
- Click
 to select a category for the Document Type field.
 - Enter a description to the Description field.
- Click

- The data is sent to the server, a message confirms the action, and the selected Box folder is added to the item.
Upload a new file to Box
- Follow steps 1-3 in Adding a Box Item above
- Select a folder in which you want to save the new file
- Click
The OS browse window opens - Locate the file you wish to upload and click Open
- Continue with step 5 through 9 in Adding a Box Item above
Creating a New Folder in Box
- Follow steps 1-3 in Adding a Box Item above.
- Select a folder under which you want to create the new folder.
- Click
The Create Folder window opens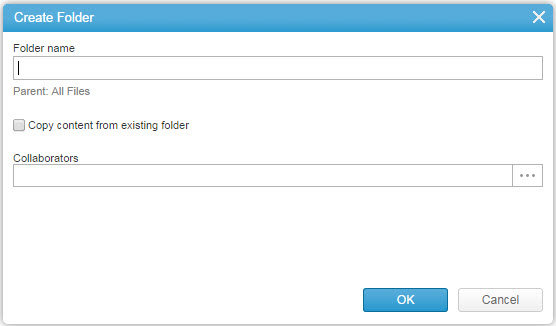
- Type the new Folder name.
- To copy the content of an existing folder:
- Select the Copy content from existing folder checkbox
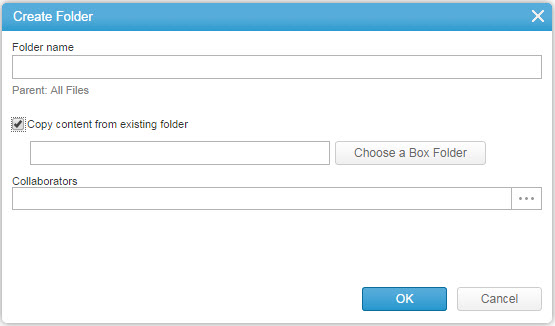
- Click
 to locate and select the folder you wish to copy
- Select the Copy content from existing folder checkbox
- Add the people who will have access to the folder in the Collaborators field
Note:
Collaborators will have both read and write permissions to the files in the folder
- Click

- Continue with step 5 through 9 in Adding a Box Item above.
Adding Notes
This page describes adding notes to Clarizen items and includes the following sections :
for the completion of a task or pertinent information on a risk.
- Navigate to and select a Clarizen item you intend to add a note to.
- Click
 located on the Add Related ribbon.
OR
Click the 'Add Related...' link located at the base of the Relations panel, and from the icon options, click

The Add Note dialog opens.
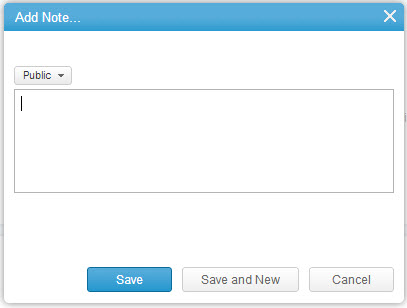
Figure 1: Add Note Dialog
- Click
 to define the note as 'public' or 'private'.

- Enter data to the text field.
- Click

The data is sent to the server, the note is added to the Notes pane in the Relations Panel.
OR
Click
The data is sent to the server, the note is added to the Notes pane in the Relations Panel, and the dialog clears
(becomes blank) to enable adding an additional note.
- Ensure that the Relations Panel is expanded.
- Click
 located on the upper-right section of the Notes pane.
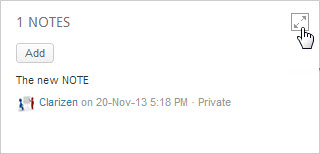
Figure 2: Expand Pane
The Notes pane expands to occupy the entire screen.
- Hover the mouse pointer over the upper-right gray-colored section of the note intended for deletion
until the becomes visible.
 - Click

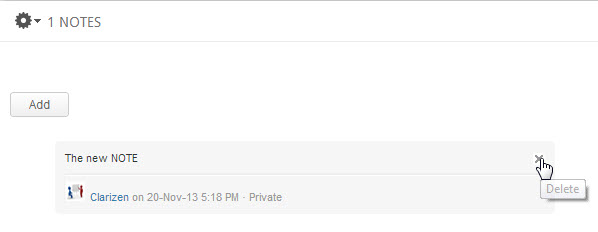
Figure 3: Delete Note
A pop-up message prompts to confirm the action .
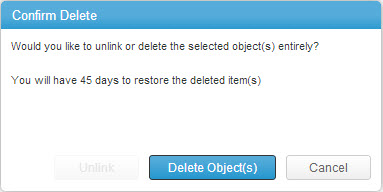
Figure 4: Confirm Action
- Click

The note is deleted.
Clicking on the Relations Panel link is broken. There are a lot of broken links in these documents.