
Note: This feature is in Beta/controlled availability. To request early access, contact your Customer Success Manager. Planview, at its own discretion, reserve the right to accept or reject a customer request to enable a feature that is in Controlled Availability (i.e. “Beta”) state. If a customer’s request is approved, an addendum to the Planview agreement will be required prior to the enablement of the feature in the customer environment, to address legal terms related to the use of Beta software.
Concept and Capabilities
You use the Migrate & Deploy tool to compare configurations of any two instances and migrate selected configurations from one "source" instance to another "target” instance in a reliable way. The tool can compare and migrate either the entire configuration of an instance or just a part of it.
The Migrate & Deploy tool is usually invoked from the instance with more recent configuration updates (“Source organization” or simply “Source”), with the intent to compare the configuration updates and migrate (synchronize) them to the “Target” instance.
For a given Migrate & Deploy session there is always a single combination (1:1) of a “Source” and a “Target” instance. Both “Source” and “Target” instances can be either from Production or Sandbox environments.
The “Source” and “Target” roles are defined by the intended direction of the configuration migration, which is always from “Source” to “Target”. It is possible to switch “Source” and “Target” instances or disconnect and reconnect to another “Target” instance.
The Migrate & Deploy tool is a very powerful tool on its own, but it can also be used in conjunction with the Instance Cloning feature to effectively support a frequent configuration update flow.
Both the comparison and the migration of configurations run using our API.
Comparison approach and capabilities
- The comparison engine of the Migrate & Deploy tool allows comparing specific configuration categories (custom fields, views, profiles, etc.).
- Inside each configuration category, the compare engine runs on each item per particular parent module (Project, Milestone, Task, etc.), and tries to match a corresponding configuration item on the “Target” side:
- If a matching item (field, view, custom action, etc.) is identified, the compare engine compares every single parameter/property of the item between the “Source” and the “Target” sides. For instance, it compares descriptions, tooltips, formulas, etc.
- If a matching item is not found on either the “Source” or “Target” sides, the item is marked as “Missing on Source/Target” in the compare results.
- Some items (such as Views, Validation Rules, Workflows and Custom Panels) cannot be uniquely identified because they have name duplications on either the “Source” or “Target” sides. In such cases, the compare engine will flag the “Error” and state that a comparison is impossible.
- Best practice: It is highly recommended to change all duplicate names of Views, Validation Rules, Workflows and Custom Panels on both “Source” and “Target” sides. This will allow the Migrate & Deploy tool to run smoothly and provide maximum value.
- Once the compare part is over (it may take up to 5 to 7 minutes, depending on the number of selected configuration categories and the size and complexity of the compared instances), all the detailed comparison results can be downloaded in an Excel file. In the file, all the “Diffs” (differences) are automatically highlighted and can be easily filtered out for closer analysis.
- In addition to the detailed comparison results, a high-level list of differences is displayed in the UI for a quick assessment of configuration differences and selection of particular items/categories to be further migrated (synchronized) to the “Target” side.
Migration approach and capabilities
- The migration part of the Migrate & Deploy tool allows migrating selected configuration items/categories.
- The migration engine can either update an existing configuration item (field, view, profile, etc.), or create an item on the “Target” side.
- In any case, it is impossible to update only specific properties in an item. Only the entire item can be migrated.
- The migration engine does not delete any configuration item on a “Target” side, even if a corresponding item does not exist on the “Source” side anymore.
- Items that cannot be compared (such as specific items with name duplications - see Comparison approach and capabilities), cannot not be selected for migration.
- During the migration process, the engine checks for dependencies and automatically pulls all the dependent items along with an item selected for migration. A detailed dependency list is displayed prior to the actual migration, so that it is possible to assess the actual impact of a migration and take actions accordingly.
- If a configuration item is dependent on a user group or a discussion group, then the group will be automatically created and linked to the item in the target instance. However, the members of the group (users) will note be automatically created in the target instance.
- In all cases, an item cannot be migrated without its dependencies
- Customizations that reference a particular data item (user, project, etc.) must be resolved manually on the “Target” side
- If the user with the same user name exists on Target, the application will try to match it.
- Custom fields with any type mismatch between “Source” and “Target” sides (Field Type mismatch, Reference Type mismatch, Relation Summary Type mismatch, etc.) cannot be migrated.
Picklist Management:
- If a picklist is selected for a migration, then its values will be overridden in the target instance
- If a picklist is pulled along as a dependency by another item, then its values will be preserved in the target instance
Limitations
These are some limitations to be aware of regarding the Migrate & Deploy tool:
- The Migrate & Deploy tool is relevant only for customers who have a Sandbox Instance
- All views (both system and private) are compared. This currently leads to extensive compare times of the Views category
- Picklist values that have the ampersand character (&) in their names cannot be migrated
- The ‘ExposeBaseCurrency’ flag in currency fields is not set during migration
- Currency defaults are not migrated because they are a part of “data”, rather than “metadata”
- The current version can migrate up to 1000 picklist values in a single picklist
For the complete list of current limitations, refer to the Appendix at the end of this article.
Best Practices:
- It is not recommended to select all configuration categories to compare at once. For large accounts, the compare time may exceed the 5-minute connection timeout
- Some configuration categories (such as Views and Profiles) may potentially have long compare times, as these are complex configuration structures
- It is not recommended to select more than 100 custom fields at once to migrate. Instead, do it in several chunks.
- Because the migration performs actual configuration changes on a “Target” side, it is advised to start from a small number of changes in a single migration session, and verify the results after each migration, either manually or by re-running a comparison.
Usage
Access the Migrate & Deploy tool under the Migrate & Deploy tab in Settings. Only admins can access these settings:
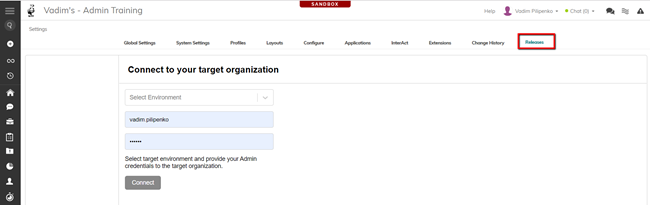
Connecting to a Target Instance
To run the Migrate & Deploy process, Admin credentials for both the source and target instances are required.
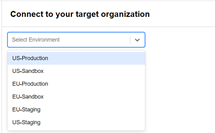
- In the Migrate & Deploy screen of the “Source” instance, choose the environment (for example, US-Production, US-Sandbox, etc.) where the “Target” instance is located.
- Provide login credentials for the target instance.
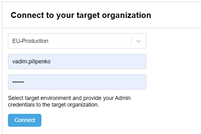
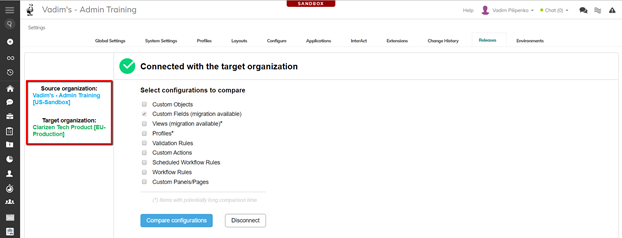
- Click Connect and wait to be connected with the target instance. Verify the names of the source and target instances and their corresponding environments on the left side of the screen:
- To reconnect to a different target instance, click Disconnect.
Note: Refreshing this screen will automatically disconnect you from your target instance.
Comparing Configurations
To start comparing configurations between the source and the target instances, select the configuration categories that you want to compare, and then click Compare configurations:
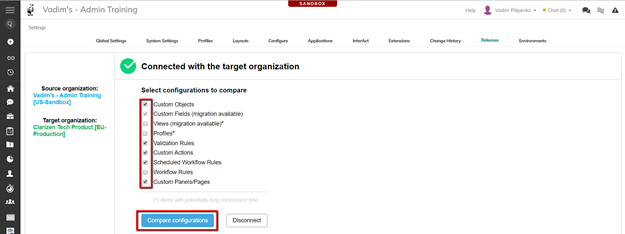
Notes:
- A comparison may take up to 5 to 7 minutes, depending on the size and complexity of the compared configurations
- The Custom Fields category is selected by default and cannot be unchecked
- Some categories (like Views and Profiles) may potentially have long comparison times, due to their complexity
Viewing High-Level Comparison Results
Once a comparison is successfully completed, the high-level comparison results are displayed in a grid. Only categories that can be migrated in a particular delivery stage are shown in the table. The categories appear collapsed by default, but can be expanded by clicking them:
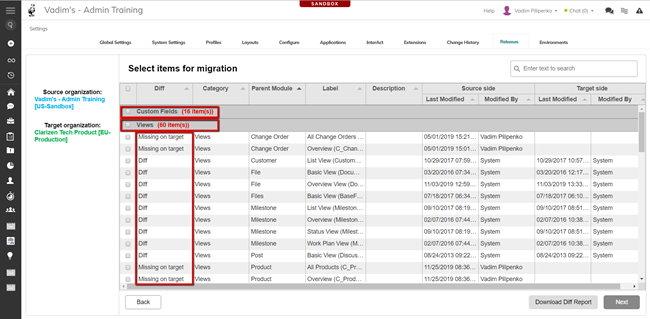
Columns in the grid:
Diff – indicates whether there is a diff or if an item is missing on target. Missing items in the source or items that are identical on both sides are not shown in this table.
Category – the configuration category (and type for Custom Fields and Views) of an item
Parent Module – the parent module an item is linked to
Label – the actual name (label) of an item as it appears on the source side
Description – the description of an item as it’s defined on the source side
Source side (Last Modified / Modified By) – by who and when an item on the source side was last modified
Target side (Last Modified / Modified By) – by who and when a pre-existing item on the target side was last modified
Notes:
- The high-level results allow you to select items for migration (see further sections), therefore they contain only limited information about items with diffs or items that do not exist in the target instance.
- You can sort the contents of the table by a particular column
- If there are no differences in the selected configuration categories between the source and the target, then nothing will appear in the grid
Viewing Detailed Comparison Results
Because the high-level comparison results display only show categories eligible for migration and the information is very high-level, you may want to view the detailed comparison results by downloading an Excel-based diff report. Click Download Diff Report at the bottom right of the view:

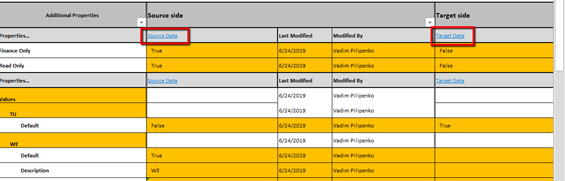
The Diff Report displays the comparison results for each selected configuration category in a separate sheet:
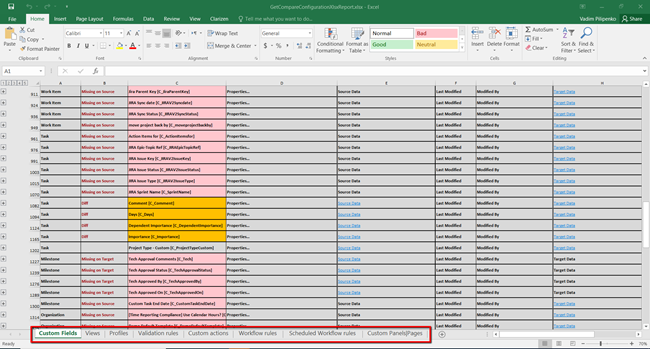
The results are grouped by default. You can expand each item separately by clicking the corresponding ‘+’ on the left or by toggling/expanding all at once using the grouping switches in the top left corner:
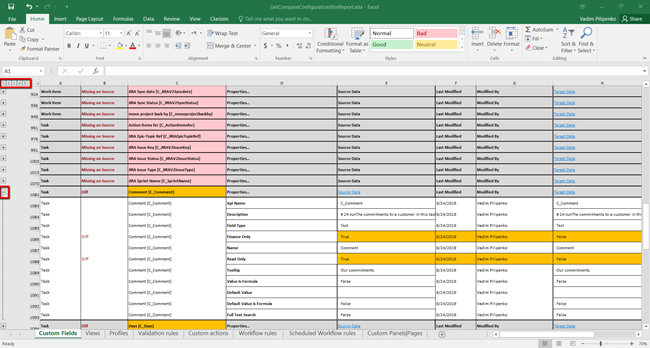
Diff report columns:
- Diff (column B) – displays the result of the compare per item:
- Empty – the items are identical on both sides (source and target)
- Diff – the item exists on both sides, but there is a difference in at least one property. Each property is marked with a “Diff” flag as well. The differences are automatically highlighted in orange
- Missing on Source/Target – means the item is missing on the source/target respectively
- Label [API name] (column C) – name of the item along with its identifier/API name
- Additional Properties (column D) – all the properties of an item that are compared by the tool
- Source side / Target side (columns E to J) – actual values of the compared properties on both sides
Tips:
To effectively read the report, you can filter the Diff column (B) by “Diff” value to display only items and properties with differences:

If an item is found on either source or target, there is a quick link to take you directly to the corresponding configuration screen in Clarizen:
Migrating a Selected Configuration
After exploring the comparison results in a detailed Diff Report, you should be able to decide which items (if any) to select for migration.
You can use the search box at the top right corner to filter desired items by typing any text (date, bits of descriptions, etc.). Then you can select all filtered items at once.
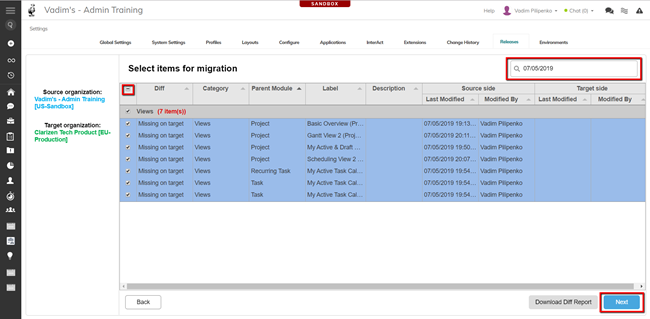
- Before you can start a migration process, you must select at least one item. Otherwise the Next button will remain disabled.
- Click Next. A summary of migration rules appears. Read them carefully and adjust your selection by going back, if needed.
- Click Validate:

During the validation stage, the system analyzes the dependencies of the selected items. The dependencies, which are pulled by the selected items, are displayed in a grid.
- If you do not want some dependencies pulled, you can uncheck any items directly inside the dependencies grid. You must uncheck an entire item before you can uncheck its specific dependencies.
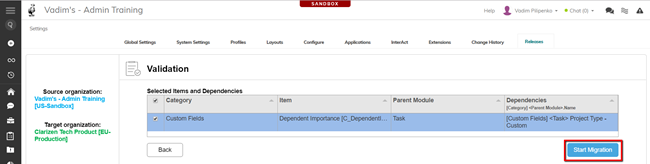
- Click Start Migration if you feel comfortable with the listed dependencies. The migration process begins.
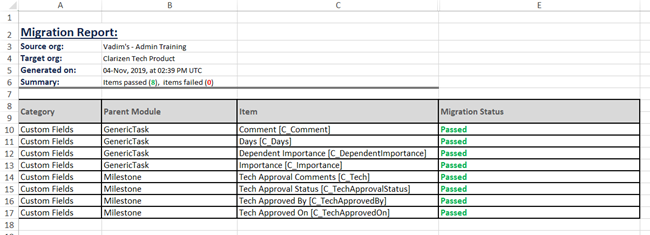
- It may take a few minutes for the migration process to finish. The actual time depends on the number of items selected for migration and their complexity. Once the migration is successfully completed, you can view the migration report or compare the configurations again:
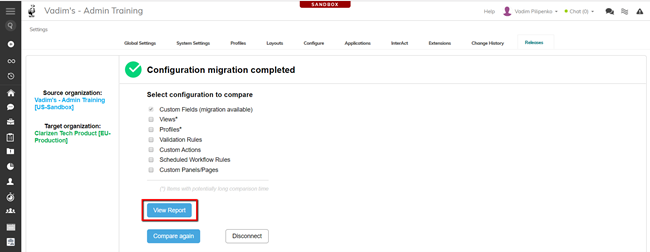
- The migration report lists the migrated items with their corresponding migration status (Passed/Failed):
Appendix - A complete list of current limitations and known issues
Metadata types which are not yet supported:
- Dynamic layouts
- Global & system settings
- Relabeled standard fields
The following customization actions are not supported currently. They will either be blocked for migration, or will migrate with warnings:
- Calculate Project Financials
- Manage Proof
- Set Proof Reviewers
- Schedule Slide Publisher
- Outbound Call with Certificate
Configurations (Fields, Rules, Entities)
- All selected configurations will be updated
- Dependent items (if any) will be listed during the validation stage
- Missing Items – such as Custom Fields, Views, Profiles, Custom Actions, etc. will be created
- Items that were part of previous configurations, but no longer are, will not be deleted on the target
Data
- Customizations that reference data items (user, project, file, etc.) may have to be resolved manually on the target. View the migration report for details.
- Data references for filters in Views, Reports an Dashboards may be skipped, if they cannot be resolved automatically on the target instance
- Data references in lookup filters in Custom Fields and Custom Actions may have to be resolved manually on the target instance
- Icons for custom object values will not be migrated
- Missing User Groups will be automatically created
Picklist Management
- If a picklist is selected for a migration, then its values will be overridden on the target instance
- If a picklist is pulled along as a dependency by another item, then its values will be preserved on the target instance
- If there is a reference to a custom value of a standard picklist, the value will be migrated if missing on the target instance
- If a custom value of a standard picklist is deleted on the source instance, it will not be deleted on the target instance
Q&As
I am only interested in comparing configurations between two instances. Does it matter which instance is the “source”, and which is the “target”?
No, the Migrate & Deploy tool is a “mediator”, which pulls the entire configuration from two connected instances and compares them item by item. It identifies which items are in sync, which items are different, and which items are missing either in the “source” or on the “target”.
Why am I getting different high-level comparison results if I switch “source” and “target” instances?
The high-level comparison results grid in the UI is intended to allow items to be selected for migration from the “source” to “target” instance. Therefore the items that are “missing in source” are not listed, which is why there may be differences when switching between “source” and “target” instances.
Comments