Tasks
A task can be created under any project work item. A task can be further detailed into other sub-tasks. At this point, the parent task becomes a container, also known as a hammock, and behaves like a milestone, summing up effort, duration, and financial values from the sub-tasks below.
A task can be redefined and given a different hierarchy to suit project changes, by redefining the task as the child or parent of any task or milestone.
Jump to:
- Task’s Work
- Task Types
- Project Tasks
- Recurring Tasks
- To Do List Items
- Creating a Task
- Creating a To Do List Item
- Tasks Module
- Task Detail View
- Task Cost and Revenue Performance
- Task Work Plan
- Task Discussions
- Updating Tasks Progress
Task’s Work
Work is measured in the same units as duration (minutes, hours, days, weeks, months).
The default value when setting a task is one day unless defined otherwise during the assignment.
A task’s work is the total labor time (measured in man-hours) that is required to complete the task (sometimes termed as Planned Effort).
A resource’s work is the total amount of work (measured in hours or days) to which they have allocated to that task.
Work of the task is a summation of the work assigned to all of the task’s resources.
Clarizen enables you to assign different amounts of work per resource on a task.
Tasks can be Followed. Following a task means that the user receives relevant Activities Today posts in their News Feed
(providing the filter is set by Follow). Additionally, Clarizen generates emails to followers of discussions (if defined in System Settings).
A Followers Relations Panel shows all automatic Followers (team members) or manually self-assigned Followers.
Regarding user items, you can see both who a user is Following, and who is Following that user.
Task Types
There are three main Task types:
Project Tasks
Task Icon ![]()
Project tasks are the most common sub-task type.
A project manager or other manager may create a project task under any work item.
Recurring Tasks
Recurring Task Icon 
Recurring tasks are regular tasks that are scheduled as ongoing and intermittent, they are available as tasks relating to projects or milestones.
For example, a recurring task could be the submission of a weekly status report or attending a regularly scheduled webinar.
To Do List Items
To Do List Icon 
To Do List items are 'standalone' regular tasks unconnected to any project or other Clarizen parent item,
and are therefore not under any project hierarchy.
For example, a To Do List item could be an activity you assign to yourself, such as to conduct research on a specific topic, or an activity assigned to a resource by a manager to prepare a presentation, or complete a bug status report.
Note: To Do Tasks are not included, and do not affect financials.
Creating a Task
Creating a Task via the Navigation Panel
The Add New Task pop-up window or in-line editor opens.
 and
and  options, whereas pop-up windows are not.
Layouts for defining new items can be configured to display information and/or fields as pop-up windows or as inline editors by your organization's Admin user, via Layout Settings.
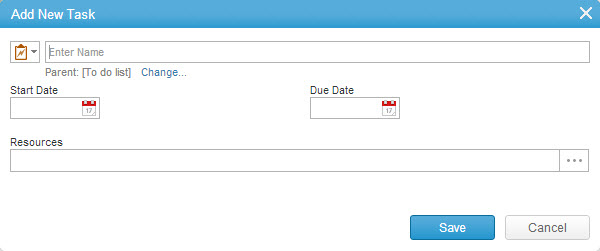
Figure 1: Add New Task

- Click the Start Date field to define the task's start date .
- Click the Due Date field to define the due date.
- In the Resources field, click
 to select one or more resources.
 - Click

The new task opens in Item Detail view.
Creating a Task from a Work Plan
- Navigate to a project's Item Detail view.
- On the Work Plan
 ribbon, click
  and select Task.
A new task window opens.
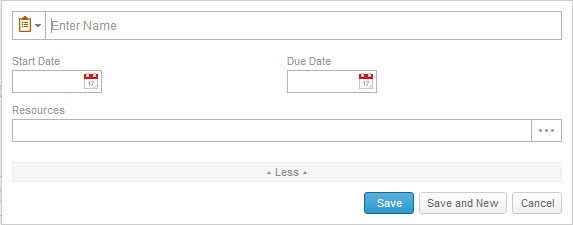
Figure 2: Add New Task
- Follow Steps 3 through 8 of Creating a Task via the Navigation Panel.
Creating a Recurring Task
- Navigate to a project's Item Detail view.
- On the Work Plan
 ribbon, click
  and select Recurring Task .
A new Recurring Task pop-up window opens.
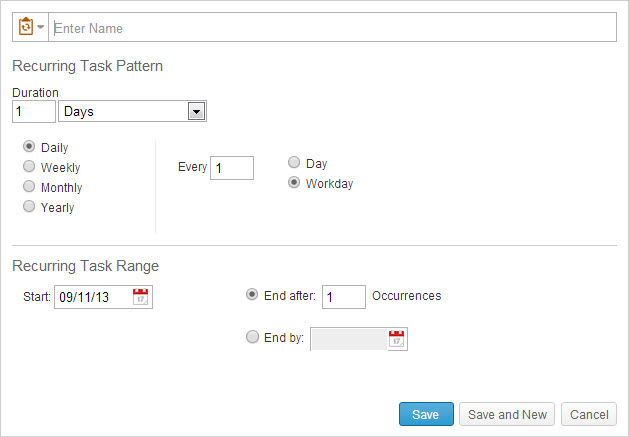
Figure 3: Recurring Task Pop-up Window
- Enter the task name.
To upload a custom icon , click the default task icon on the left.

- Define the Recurring Task Pattern Duration fields with the required amount value, and click
 to define the duration period.
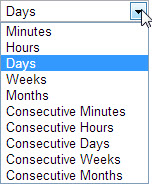
- Define the frequency fields.

- Define the Recurring Task Range Start date field and End after o ccurrences or End by fields.
- Click

The recurring task is generated and the server is updated.
OR
Click
The recurring task is generated and new Recurring Task pop-up window opens.
Creating Tasks from Modules
the Layout Settings.
Creating a Task from the Tasks Module
- Access the Tasks module.
- Click
 located on the ribbon.
The Add New Task window opens. - Follow Steps 3 through 8 of Creating a Task via the Navigation Panel.
Creating a Task from the Work Items Module
- Access the Work Items module.
- Click
 located on the ribbon.
 - Select Task from the drop-down menu.
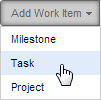
The Add New Task window opens.
Follow Steps 3 through 8 of Creating a Task via the Navigation Panel.
Creating a To Do List Item
To Do List items are 'stand alone' regular tasks unconnected to any project or other Clarizen parent item, and are therefore
not under any project hierarchy . Creating a To Do List item is done the same way as creating a task yet refraining from changing (defining) the new item's parent for the new task to be defined as a To Do List item.
- See 'Creating a Task' and follow Steps 1 through 3 and then Steps 5 through 8 (ensuring to omit Step 4 from the procedure).
Tasks Module
View Navigator

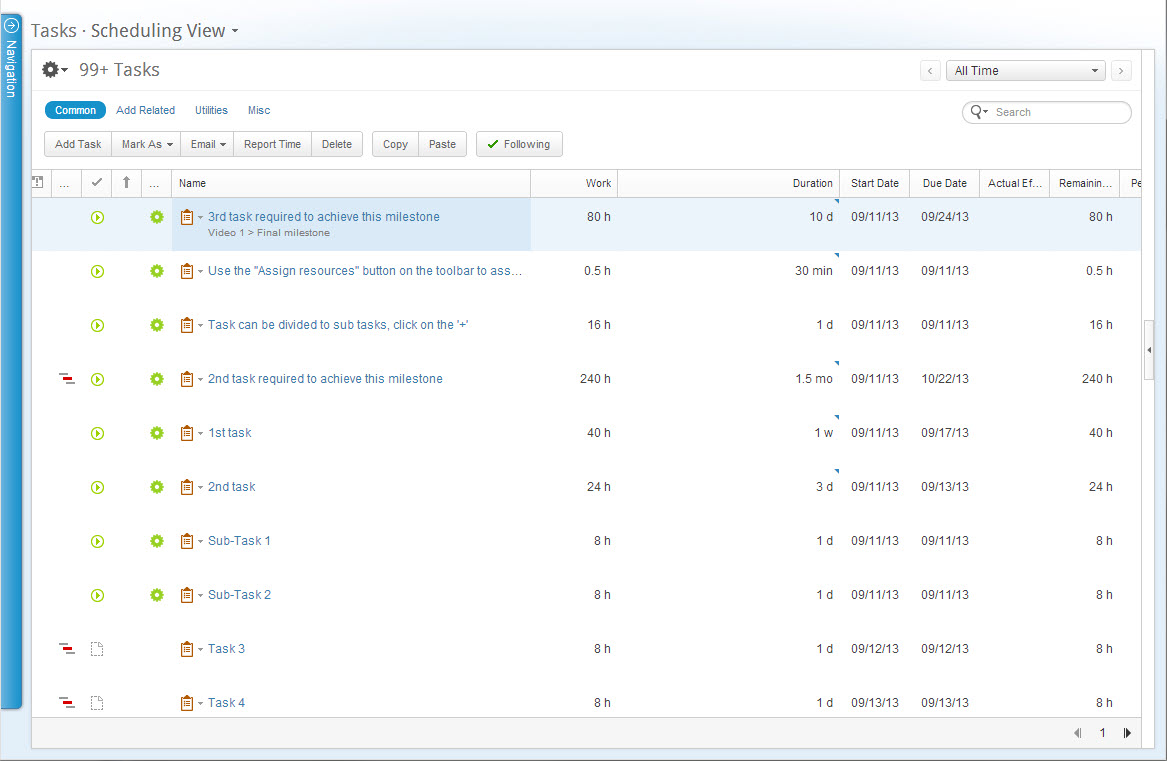
Grid
The grid is Clarizen's standard data table display for viewing, managing, and editing data and items in most modules.
A grid display is one of three display type options used to configure several of the out-of-the-box view options available in
the View Navigator for most modules.
Using the Time Range Filter enables filtering the grid to show items and events occurring during the actual period/date(s) defined.
Clicking the  icon, located above the ribbon enables managing grid column sets which can then be further filtered and sorted.
Searching and Filtering
The Tasks module can be searched and filtered for items and data using the Contextual Search and the Time Range Filter .
Note: Clarizen can be searched globally using the Global Search tool.
Ribbon
The Tasks module ribbon, located under the masthead (at the top-left) provides controls for performing actions on selected items.

Relations Panel
The Tasks module grid displays include the Relations Panel, located on the right-hand side of the screen.
The Relations Panel displays any related items, such as assigned resources , files , and discussions, etc.) of a selected item type in the grid, as well as cases including bugs, issues and requests, and enables working with the related items while staying in context of your original view.
The panel is blank when multiple items are selected.
Properties Card
A Task's properties card can be accessed from the Tasks module by selecting the item in the grid, and clicking  located in the Relations Panel.
Tasks View
The Cards View for Tasks displays your Tasks on a board. The Cards View provides a birdseye view of your Tasks, with options to sort and group Tasks, as well as update a Task's Status, Phase, etc. using drag and drop.
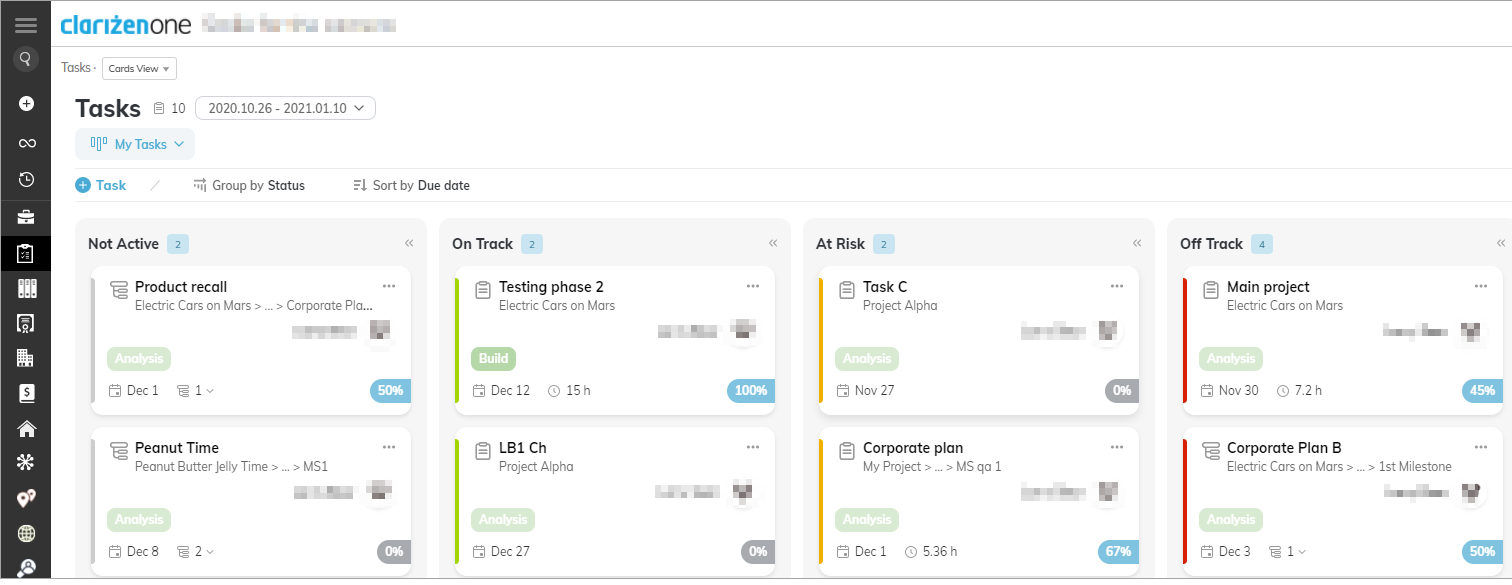
In Card View, you will see Tasks that you own or where you are assigned as a resource.
Coming soon: If you are a manager, you will also see Tasks assigned to resources that you manage.
Selecting Which Tasks to View
You can choose to display your Tasks from Work Items by selecting My Tasks, or your standalone Tasks by selecting My To-Do-List.
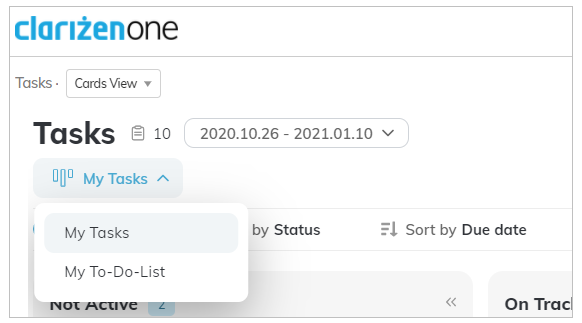
The default period displays Tasks for the current month. This includes Tasks with a Start Date during the selected period, or with a Due Date in the period for Tasks without a Start Date. Tasks without a Start/Due Date are also displayed.
Completed Tasks within the selected period are displayed. Completed Tasks prior to the selected period are not displayed.
To see sub-Tasks, expand the card. You can also add or delete a Sub-Task, and see more info.
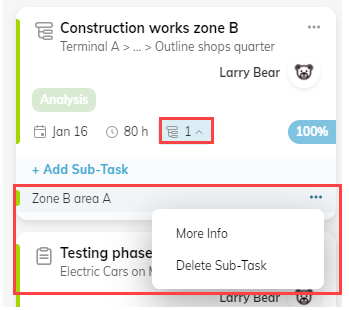
To change the period, click on the arrow in the date picker.
Group by
- Status
- Phase
- Importance
- State
Show Hide Columns
Expand or collapse columns to show or hide a group.

Sort by
Select how to sort Tasks within the columns:
- Status
- Due Date
- Importance
- Owner
Managing Tasks
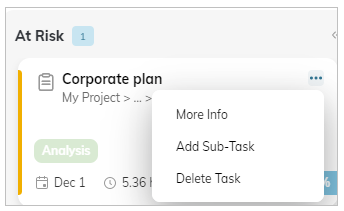
Click on the 3-dot menu to:
- More Info: The Task's Property Card displays additional Task details that you can edit.
- Add Sub-Task: Add a new sub-Task to your Task. If you already have sub-Tasks, you can add more from the card.

- Delete Task
- Move a Task - To move a Task to a different column (Status, Phase, etc.), drag and drop the Task into the required column.
Task Detail View
Building Your Work Plan
The Work Plan panel is available in all work item detail views and enables adding tasks to build out the structure of your project.
Expenses
Expenses are a user's expenditures linked to their work activities. The Expense Sheets module can be used to track relevant information about expenses such as the following items:
- What was purchased
- How much was spent
- Reason for purchasing
- Whether purchasing was done within the activities of a specific project
- Whether an expense is billable to a customer
- Whether an employee needs to be reimbursed
Click here for more on expenses in Clarizen
Task Cost and Revenue Performance
Cost and Revenue Performance in Clarizen has several 'out-of-the-box' KPIs to measure cost and revenue performance, including CPI and RPI.
You can link work-related cases directly to wok items using the 'Related Work' link, thus enabling you to track cases or work items directly. Alternatively, you can view which work items are affected by an individual case.
Click here for more on these and other financial fields
Task Work Plan
Work Plan
Work Plan panels provide a clear, easy to follow view of work items broken down into sub-items in a tree format.
In project management terminology, this is a WBS, a work breakdown structure.
Click here for more on the Work Plan Panel
Task Discussions
Discussions on a specific task in Clarizen can be initiated, shared and replied to in order to facilitate work item team or group collaboration.
Discussions centered on a specific task appear in the task Relations Panel and dedicated panels in task Item Detail views .
 w hen no discussion exist.
Click here for more on discussions in Clarizen
Updating Tasks Progress
Several methods are available for updating task progress.
- % completion
- Actual & Remaining effort
- Done/not done
- Actual Effort Updated from Timesheets + combination of manual completion
The method you choose depends on what information you intend to gather from your resources regarding work item progress.
Once a progress update is made to a task, Clarizen automatically updates that work item within the project itself.
Via the Project Detail View
The Project module is the first place where you can start updating task progress. You can filter through projects by selecting
projects in a specific state as well as what type of role you have in projects. The module displays information on the overall
projects' health and enables you to drill-down into a project by selecting it, directing you to its Item Detail view.
The Work Plan shows a project's various ongoing tasks in hierarchical order, enabling you to filter through according to current state (in the works, active, draft, on hold or upcoming) as well as by your role (manager, resource or reviewer).
Once you filter through your tasks you can then begin the updating process. You may notice that both projects and tasks have a green/orange/red color coding next to them. These colors represent the scheduling status of your work item:
'On Track'/'At Risk'/'Off Track'/'Not Active' respectively.
To update your progress on a task, select the task and update either the % Complete field, Actual Effort or Remaining Effort field columns.
Via Email
Task progress can be updated via email, meaning that email only users can always update their progress even when they
do not have login access to Clarizen. Email updates are not limited to email only users; in fact, all users can update task progress
when they are on the go.
Updating tasks via email is possible when you receive a 'Progress Update Request' email in your inbox.
Such emails are either generated automatically by the system (the days of the week that these emails are sent on is determined in System Settings ), or you can send emails manually by selecting the Email option in a view ribbon.

Once opened, this type of email lists the tasks currently assigned to you, what you have so far reported on each task, and
what progress Clarizen currently expects from you.
You are provided with options of how to update your progress:
- Clicking the 'Quick Update' opens a window providing the option to enter your 'Actual % Completed'. Alternatively, enter
your 'Actual Effort' or 'Remaining Effort'.
Once you have updated your progress, click Submit. Clarizen is automatically updated. - Clicking the 'My Progress is According to Plan' hyperlink informs Clarizen that your reported percent complete is equal to
the expected percent complete. Clarizen is automatically updated.
Additionally, when updating task progress via emails, you can insert a note that links to the task within the WBS.
progress using this method.
Via Task's Item Detail View
As with updating via the Project module, updating task progress can be done via a task's actual Item Detail view,
accessed by either navigating directly to the task in the Task module or from the Work Items module or via the Roadmap.
Select the task and upda t e either the % Complete field, Actual Effort or Remaining Effort field columns.
Via Timesheets
The Timesheets module is used by organizations to track actual hours of work on individual work items.
Report task progress via Timesheets by clicking located on the Common ribbon .
The Timesheets module contains a list of all reportable work items that can be filtered to find a specific work item.
You can enter the hours worked on each individual day f or each reportable work item.
For overtime hours on a work item that also has regular hours, select the specific item grid line and click Duplicate line on the Common ribbon. The work item line then replicates and you can enter additional hours and mark them as overtime.
Once you have completed entering hours for the given timeframe click Submit on the Common ribbon and the entered hours are sent to your project manager or direct manager for approval.
Once approval is granted, the hours are reflected in the related project and % Completed is displayed on individual work items.
Note: Although Timesheets a required to be submitted, 'Approvals' can be disabled or enabled for your organization, and you can define — per work item — whether or not the work item's Actual Effort is updated by Timesheets.

There is no additional information on the work plan. Clicking the link above (https://success.clarizen.com/item-detail-views$Work%20Plan%20Panel) takes you to a page that doesn't exist. Not very helpful.
Same for tasks......takes you to a page that doesn't exist.
No action taken on the comments above - disappointing.
I'm blocked with the "To do list". I'll end up asking Google
Users may want to refer to the manual:
http://usermanual.clarizen.com/tasks-overview
http://usermanual.clarizen.com/creating-a-task and subsequent