Discussion Groups
Discussion Groups
This page describes discussion groups and includes the following sections:
- About the Groups Panel
- Discussion Group Permissions
- Adding a Discussion Group
- Joining Discussion Groups
- Defining Membership
- Leaving a Discussion Group
- The All Company Group
- User Groups
About the Groups Panel
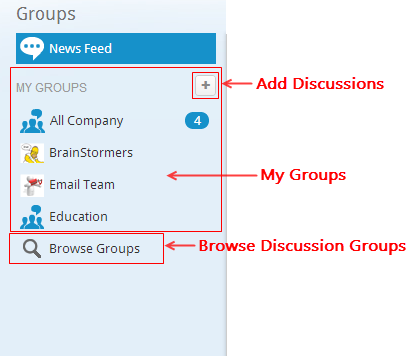
Figure 15: Groups Panel
The Groups Panel, located in the Social module's left-hand panel, displays the News Feed and the discussion groups that you are member of, or are following.

Figure 16: Default Group Discussion Icon
You are notified of new discussion group discussions by a number appearing adjacent to the specific discussion groups.
The order of discussion groups in the panel is determined by a ranking calculated by the system according to total group activity plus current user participation plus current user mentions (and other parameters). Discussions can be manually promoted the to top the panel to provide high visibility for others in the discussion.
Internal users can see all public groups. External users are limited to seeing only groups to which they are a member and private groups are only visible to team or group members. All user groups are discussion-able by default.
The  button located adjacent to MY GROUPS enables creating new discussion groups.
The Browse Groups link, located below the Groups list, accesses the Discussion Groups module from where you can join groups which are then consequently listed in your Discussions Groups Panel.
Discussion Group Permissions
The discussion group is added to your Discussion Groups Panel, and you will receive related posts in the Activities Today.
Adding a Discussion Group
- Open the Social module ; click

The Navigation Panel opens. - Click Social .
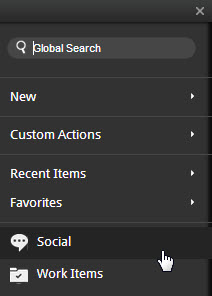
Figure 17: Select Social Module
The Social module opens.
- Click
 located adjacent to MY GROUPS.
The Add New Discussion Group window opens.
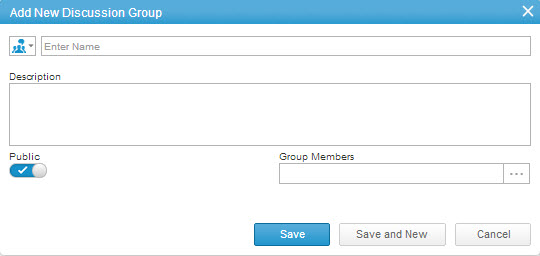
Figure 18: Add New Discussion Group
- Click
 to upload an icon for the discussion group.
 - Define a discussion group name and description.
- (Optional) Click the
 to define the discussion group as private.
 - Click
 adjacent to the Group Members field.
The Add Group Members multi-find window opens. - Configure the multi-find window as necessary.
The intended group members are added to the Add New Discussion Group window Group Members field. - Click

The data is sent to the server, the screen refreshes showing a newly created discussion group listed in the
Groups Panel.
 to save the new discussion group and open a blank Add New Discussion Group window.
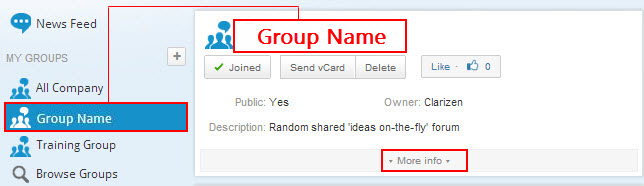
Figure 19: Group Properties Card
The discussion group is created.
Joining Discussion Groups
- Open the Social module; click

The Navigation Panel opens.
- Click Social .

- Click Social .
Figure 20: Select Social Module
The Social module opens.
- Click
 located at the base of the Groups Panel.
The Discussion Groups module opens.

- Ensure the All view is currently open (or select it via View Navigator).
- Select a group from the grid.
- Click

The button changes to
You have joined the group.
Defining Membership
-
Access the Social module and select the discussion group from the Groups Panel.
The discussion group opens (in Item Detail view) .
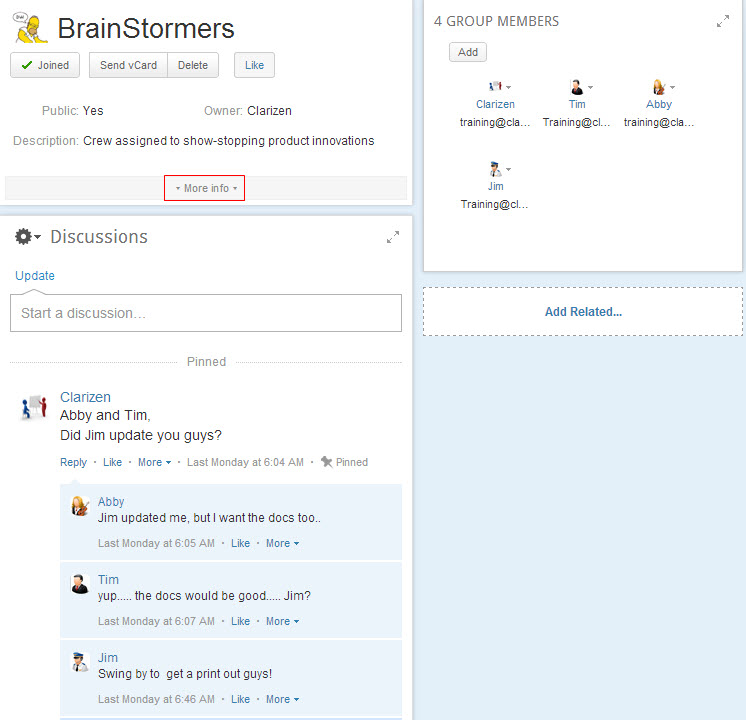
Figure 22: Discussion Group Item Detail View
-
On the discussion group Properties Card, click
 .
.
The Properties Card expands fully.
Figure 23: Expanded Properties Card
- Click the discussion name.
The name field becomes active, and the name can be edited. - Click
 to add an icon for the discussion group.
 - Position the mouse pointer over areas adjacent to other field titles in the properties card:
- Definable fields are indicated by

- Undefinable fields are indicated by
 (according to System Settings)
- Click and a define fields as necessary.
- Define fields as necessary.
Discussion group membership is defined.
Leaving a Discussion Group
- Follow Steps 1 through 3 of the above procedure.
- Select the group on the grid to leave.
- Position the mouse pointer over

The button changes to
- Click

The button changes to and your user profile has no association to the discussion group.
The All Company Group
Internal Users within the organization are automatically added to the Clarizen out-of-the-box All Company group which is a special group automatically created within an organization.
User Groups
User groups can be used as discussion groups.
Every internal user and can join public User Groups (based on System Settings).
You can access User Groups by clicking  located at the base of the Groups Panel.
Comments