Contents
Introduction
Use Data Loader to add, update and delete data in Clarizen, by uploading Excel (xls, xlsx) or csv files. This includes Work Items such as projects and tasks, other Clarizen objects like reviewers, resources, or even custom fields. You can also upload complete Work Plans with using the full hierarchy of items.
Data Loader also gives you the option to roll back uploaded data if needed.
Note: The data loader utilizes API calls for its functionality and therefore adheres to the API governance and specifications defined by Clarizen.
How it Works
The process is a 2-stage process:
- A file is uploaded using the Data Loader, which contains the data to be inserted or updated. The data is then verified with pre-load validations. Data is still not in Clarizen.
- Once validated, an email is generated and sent to the User who performed the upload procedure, and a task with the load details opens on a default upload project within the organization. The task will typically come with a few attached documents including the original load file with the data, an Errors/Messages file from the load, and an Undo file to undo the transaction.
Tip: It is strongly recommended that the User performing the upload procedure is an Admin User, Super User, or Financial User, to avoid 'update blocks' due to insufficient permissions.
Adding Data
The process includes preparing the Excel/csv file, uploading the file, receiving the validation, and finalizing the process.
- If not yet installed, go to the apps marketplace and install the Data Loader app.
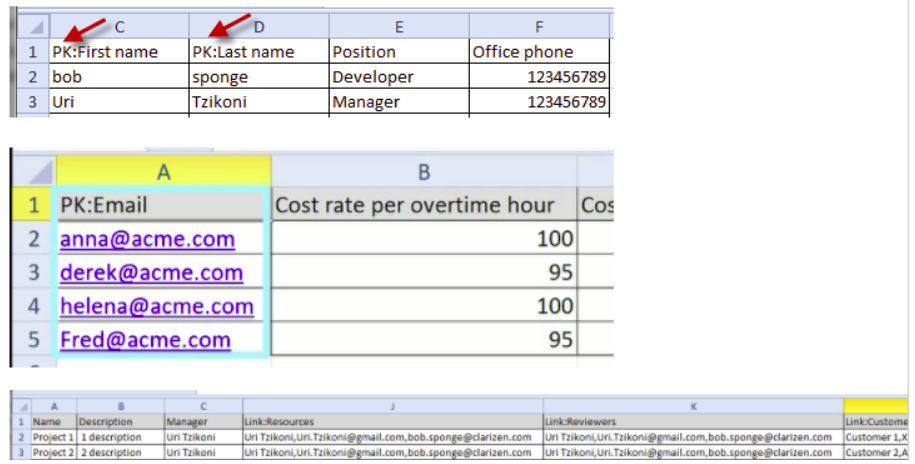
- In Excel, add the item's properties in the first row. In subsequent rows, add the items. For example, for Users, properties include first and last name.

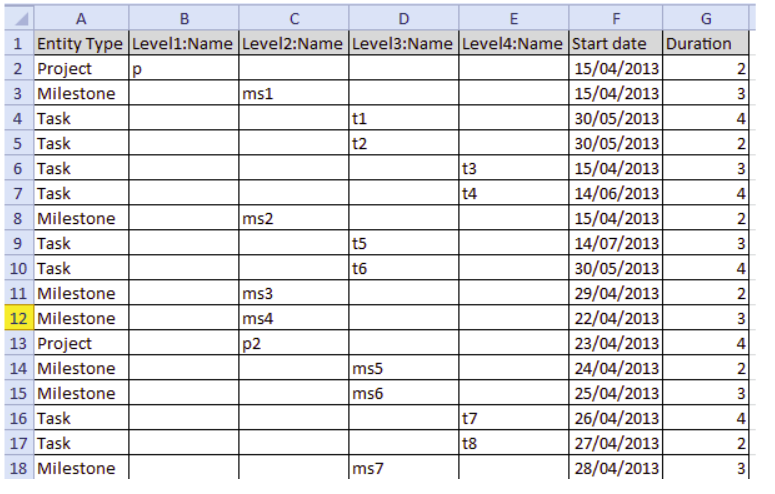
For WBS or work plan, under the EntityType column header add the relevant Item Types, such as Project or Milestone. The following columns contain the details such as name, start date, etc. A Level prefix defines a sub-level. For example, if the project is a sub-project, then the name will appear under the column with the prefix Level2:Name.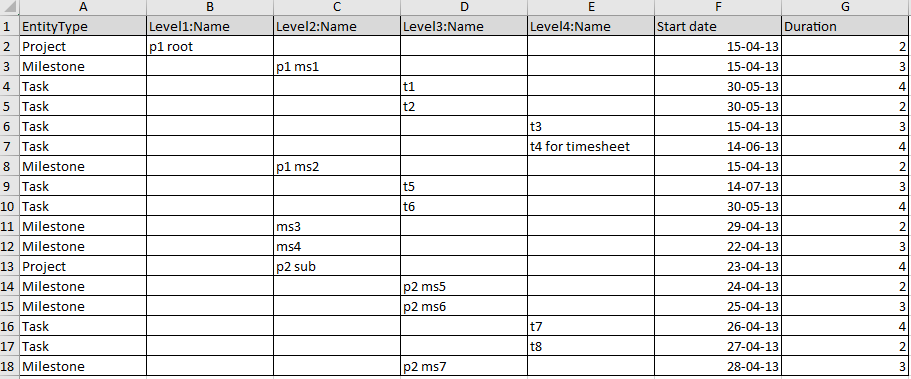
- For Reviewers and Resources items, add Link: to the prefix of the column header, for example: Link: Reviewers. You can add multiple values using comma delimiters between them.
About the field data
- The field names specified in the Header row may contain the API name or the field screen name
- Custom fields (of all types) are supported out of the box just like Clarizen system fields
- The special type field formats (such as Duration and Money) are identical to those within Clarizen
- Reference to item fields (Users excluded) are mapped by the ExternalId, Sysid or by name (as last resort)
- Reference to User fields are mapped by the ExternalId, email address, Display name and User name
- Reference to items in link fields (Resources, Reviewers, Customers etc.) operate with the same logic as regular reference to item fields with a comma separator
Note about picklists
When adding new picklist values, you must add the new values under the ExternalId column, rather than under the Description column. Add the ExternalId column to your file if it does not exist.
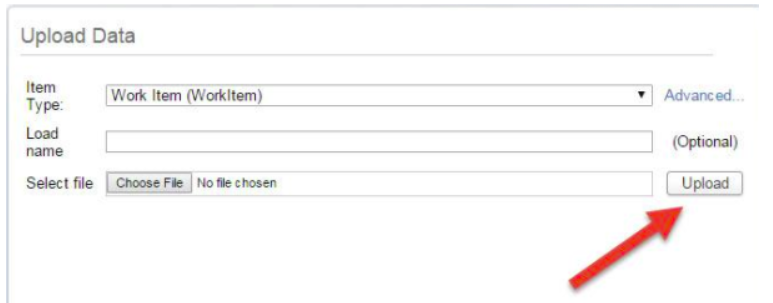
- In Clarizen, from the main menu, click Custom Actions > Data Loader.
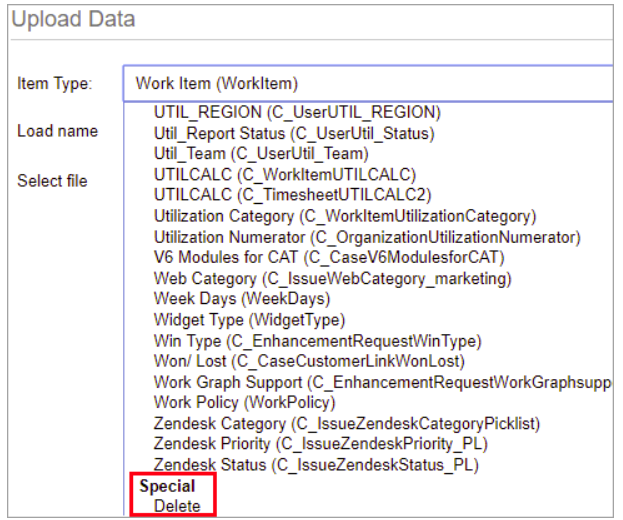
- Select the Item Type from the drop-down list. Click Advanced to see more options, and to download the field descriptions to get all possible fields for the object type.
- Fields Lookup - See a list of fields in rows
- Fields List - See a list of fields in columns, can be used to upload data

- Provide an optional name for the loading process.
-
Select your file and click Upload.
Data is verified and results are displayed.
Click on the yellow triangle to see any issues that may need fixing.
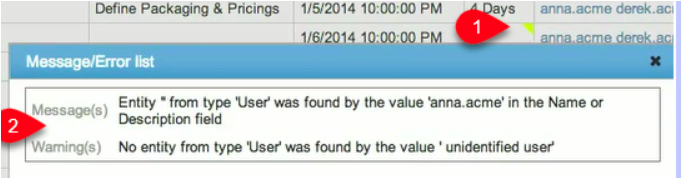
To see all messages, click to download the file.
- Click Update Clarizen.
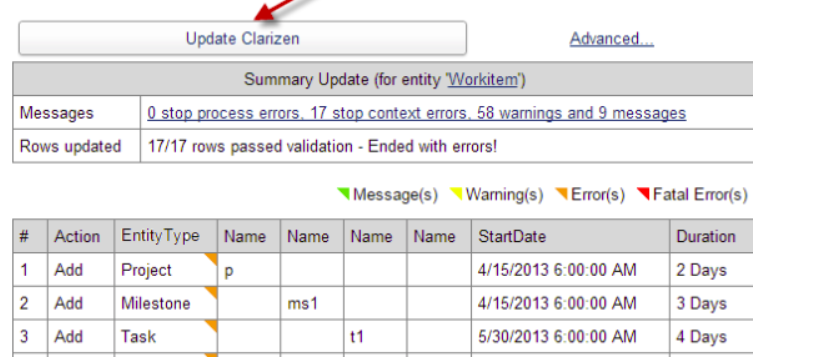
You will now receive an email confirming the data has been uploaded to Clarizen.
Click on the added item link from in the Data Loader to open the new item.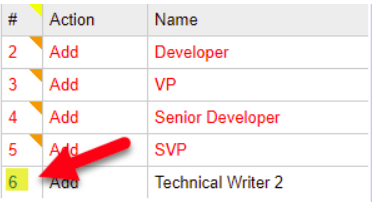
The first time you upload data, a project is created and within it a task for each data upload.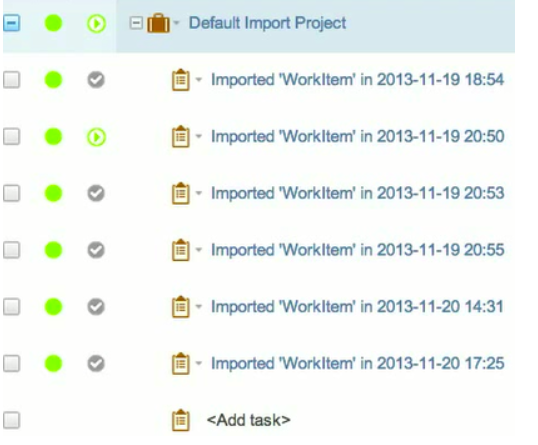
Each task includes attached files for the original import list, error logs and the undo transaction list.
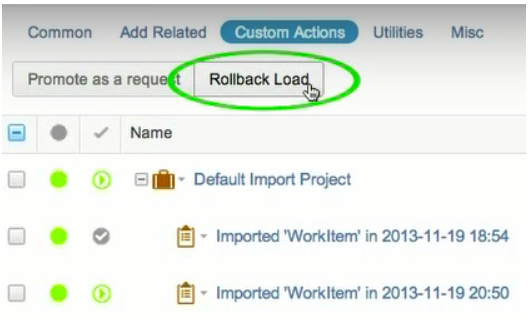
Rolling Back an Upload
To undo a transaction, select a task and click Custom Actions > Rollback Load.
Updating Data
Update existing records in Clarizen-specific tables (item types) using the item type identifier. You must choose which item identifier to use.
Then, add the PK (primary key) prefix for the object, for example: PK:Email.
The values in these columns will be added into the "where condition" that finds the relevant item.
Examples
Tip:
You can insert and update records in the same transaction by specifying the item type identifier column. If the identifier exists in the row, an update is performed, and if the identifier is blank, an insertion is performed.
When the file is ready, follow the same upload procedure explained above.
Loading an Entire Work Plan
You can load an entire project into Clarizen, including sub-projects and nested work items.
To load a work plan file:
- Add a column named EntityType and specify the relevant work items type (project, milestone or task).
- Select the work item item type and load a file containing 'Level1:Name', 'Level2:Name'…'LevelN:Name' in the file Header row.
Adding Work items to an Existing Project
To add work items to an existing project you have to run a designated custom action on the specific project.
All work items loaded in this load are linked to the selected project.
Adding Data Using a Template
You can specify a list of project and/or milestones that you want to create from a template. Add a column with the value FromTemplate in the header row.
When creating a project from a template, the values identify the data cells in the template name in Clarizen (for example, My Template Name).

When creating a milestone from a template, enter the template names in the data, followed by a comma, and the milestone parent name (for example, My Template Name,Parent name).

Deleting Items
To delete items:
- In the Data Loader app, open the Item Type drop-down list, scroll down to the bottom of the list, and select Delete.
- In the Excel file, include the EntityType (such as task, resource, etc.) and its related ExternalID.
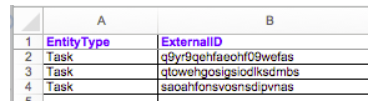
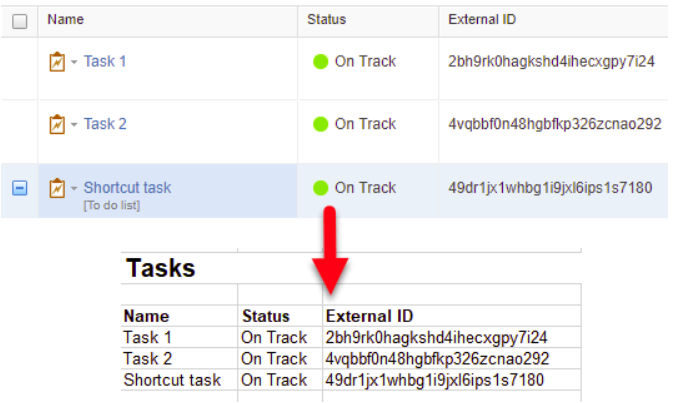
To get the External ID of an item, you have a number of methods:- You can add the External ID to your grid view in Clarizen, and then export to Excel.
- You can generate a report from the Reports module that includes External IDs.
- You can use the Excel Add-in to extract External IDs.
- You can add the External ID to your grid view in Clarizen, and then export to Excel.
- Now upload the file as you would for adding and editing data. Select your Excel file and click Upload. See Adding and Uploading Data.
Undo an Upload
At any time, you can decide to undo the entire load and delete all the records inserted in a specific load batch.
The Undo feature works only on inserted records and not on updated ones.
To undo a specific load:
- Click Advance.
- Click Undo Load.
- Search for the relevant load transaction.
- Click the Undo button for the specific load, and wait for the record to be deleted.
API Support
You can also activate this load process by invoking a REST API web service.
To activate this functionality, please contact your Clarizen representative.
Example Files
Excel file examples are available for download.
Hi! Can I use dataloader for adding risks? Thanks!
Yes, you can. As long as there is a template available (there is a Risk template) you can use Data Loader.
Is it possible to use data loader to change the project of a Milestone to move it to another project?
Hi!
We tried using Data Loader to import tasks to mark some lines as invoiced. We uploaded the invoice numbers. When we re-run the report, it's showing again.
Hello, we have been testing the upload with with a template. It seems to work when the column is labeled 'FromTemplate:' (with a colon at the end). This is clear from the screenshot, not from the description.
Is it correct that the colon is mandatory here?
"You can specify a list of project and/or milestones that you want to create from a template. Add a column with the value FromTemplate in the header row."
Very user friendly tool. Thank you for this.
I am just a user of Clarizen, not an admin. However I must file expense reports (expense sheets) for my travel expenses. I use a mobile app that is extremely simple and easy to use which helps keep my travel expenses organized. It can export data to CSV files and am looking for a way to import that data (expense report line item expenses ie: lunch, dinner, gas, car rental, etc). The above document talks about needing admin privileges and also how to import data for tasks and other stuff, but nothing about expense sheets. Can you add a how-to section if this is possible? Thank you.
Also, I don't see where "custom actions - data loader" is at. This is probably because I am not an Admin. Clarizen needs a method that allows regular users to import data - the above method is quite intricate and ONLY if you have access to it. But there are lots of cases where non-admins need the ability to import data - like expense reports. Clarizen is NOT effective for entering data while in the field and mobile apps provide much better solutions. Importing CSV data should not be such a hassle...or in this case, impossible to do.
This doesn't actually show how to complete the forms, nor is it up to date with the current version of the data loader. I had to create my own template after uploading via trial and error tons of times ... and guess what, this thing doesn't update a single field any way. But I a can't get anyone on the phone real time to review so now i'm just stuck updating 325 project records manually when I was told this was available.
HUGE NOTE for anyone doing a Google Search on running Data Loader for Pick Lists; but you really need to pay attention to their little "footnote".
Note about picklists
When adding new picklist values, you must add the new values under the ExternalId column, rather than under the Description column. Add the ExternalId column to your file if it does not exist.
The External ID column does NOT exist in their Template; so if you hit DOWNLOAD TEMPLATE in Data Loader, then you will NOT see this column and instead there will be Description. Basically, RENAME Description header to "ExternalID" and then add your Text values; but they REALLY should update the Template to show "External ID".
Hope this helps someone from having to file a Support Ticket, hahaha...