
Introduction
Let’s just say we get it and we’re here to help! There’s always more work and not enough bodies around to do it all. Every organization and team is constantly managing the priority of work against its limited resource pool. And to further complicate things, every group does this in a slightly unique way as it pertains to their business process. Some may want to simply identify resources at a high level that will work on a project and others may need to assign resources to tasks along with a formal request process. Some assign resources out of a centralized resourcing group while for others this function is more decentralized.
This best practice is meant to cover resourcing activities we encounter the most and how to manage them effectively. It will depend upon what you’re trying to accomplish and the constraints of your current team, which ultimately decides how you resource as a team.
For smaller teams, it’s recommended to take a higher level approach. This way, it’s easy to assign a project to resources without having to make detailed resource assignments. If you take this approach along with templates, you can really automate a lot of the project setup and spend more of your time making decisions.
For larger teams, depending on how centralized or decentralized your resourcing decisions are made, you can take advantage of a number of out of the box tools, like skills, and simple applications to help manage your diverse resource pool. Use automation to enable group selection or have a formal resource request process.
As you read the following sections, take note of the sections that align to your current process. Not everyone manages their human resources the same so some of these sections may not apply to you.
Lastly, having clear communication with your resources on what they are assigned to and any updates or changes will be handled via notifications, alerts and discussions so your resources are properly aligned with your process.
Identify initial need for Project Pool
Intended Role: Project Manager
Description:
At the initiation of a project, a major need of the project manager is locating the necessary resources to complete the project. At the start, a generic pool of resources should be defined so that the PM understands which roles have the largest amount of need and group leaders can help plan for project coming down the pipeline. Additionally, it will assist in determining if there are any resource constraints that may impact the project delivery date.
It’s recommended that you first assign placeholder resources as a way to let groups know what groups know you require work from their team.
Recommended implementation:
If your organization has a repeatable process, we recommend leveraging project templates in Clarizen to set pre-populated placeholder resources.
Admin Steps:
Create a project details view “Project Overview” view.
- Restrict sharing to only those Profiles that should be allowed to manage projects.
- The view ideally should be set up as a single column view
- Expose the following panels in order, Property Card, Roadmap, Work Plan, Resources, Discussions (Add any additional panels you may need)
- In the Resources panel, set the “Display As” to “Resource Planning”
Group Set Up
- Create the different groups that reflect your team
- Add placeholder resources to each group.
Note: To help discovery, we recommend using the $ in the name. So, if you are setting up a Security group, you would create a new user with the name “$Security”. Click here to learn more. - Assign members to the group.
End User Steps:
- Access a project in the resource planning enabled view created above.
- If a template isn’t used, manually set the duration to include the time periods you wish to resource. So if you think this is going to be a 3 months project, either add 90 days or 3 months.
- Add placeholder resources to indicate which group or type of resource you need
- Set forecasted efforts in the time periods to the right of the resource. Hint: You can copy a past cell horizontally.
Locate and assign resources to Project Pool
Intended Role: Resource Manager/Project Manager
Description:
Once a pool of resource need has been defined, it’s important to be able to easily identify suitable available resources so that you can fill the demand. You’ll want to be able to look across your resource pool, see overall capacity, and be able to compare current load to future demand.
Recommended implementation:
Open the resource load from the navigation panel or click “Resource Load” in a group or Work Item view. Leverage groups and placeholder resources to view load and demand across the team.
Admin Steps:
Add resource load to navigation panel
- Go to Settings → Profiles → Select Desired Profile
- Select Navigation
- Move “Resource Load” from the left to the right if it’s not already selected
- Verify “Resource Load” is available in the Profile’s action ribbon for Groups and Projects
- Go to Settings → Profiles → Select Desired Profile
- Select “Work Item” in menu
- Select Actions → Ribbon actions → Edit
- Verify Resource Load is available
- Repeat for “Projects” under Work Item
End User Steps:
- If in a project → select resource load
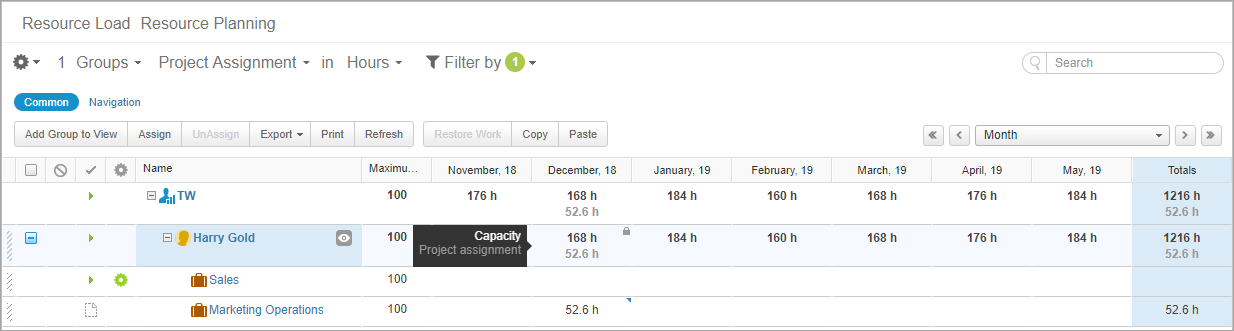
- In the upper left, verify you are in “Group” load. (See image below)
- In the gear icon, make sure you are in “Resource Planning” (See image below)
- Set Units to “Hours” (See image below)
- Lastly, make sure you are in “Project Planning” mode ( See image below )
- Expand hammock to see resources, taking note of total “Capacity” and “Project Assignment”
- Expand out the hammock for the placeholder resource to view all new demand
- Locate a resource that can take on that demand and drag project from the placeholder to the selected resource.
- (Hint: If you wish to have a conversation with the PM, it’s very easy to use the feature, found when you hover your mouse, to create a discussion on that project)
Build a detailed project plan
Intended Role: Project Manager
Description:
Once resources have been staffed to the project and exist as part of the resource pool, building the detailed project plan can begin. Clarizen’s Work Plan Panel equips project managers with a number of tools, including a grid view of the work breakdown structure as well as a Gantt view.
Admin Steps:
If your organization has a repeatable process, the best practice is to leverage project templates in Clarizen to define a project plan that already includes a detailed work breakdown. This ensures that the project’s task dependencies, placeholder resource assignments and associated files are automatically created for new projects.
End User Steps:
- Access a project using a detailed view (e.g. Project Overview).
- In the Work Plan Panel, modify the work breakdown structure.
* See Clarizen’s Foundation Training for Project Mgmt 101: Part 1 Building Projects and Templates for additional tips and tricks
Assign work from resource pool
Intended Role: Project Manager/Resource Manager
Description:
Once project work has been scoped and the resource pool has been staffed, individual resources can be assigned to specific work items. Clarizen offers a flexible and easy way to accomplish this using the Replace Resource functionality if you have placeholder resources assigned from a template.
Admin Steps:
If your organization has a repeatable process, the best practice is to leverage project templates in Clarizen to set pre-populated placeholder resources. This ensures that the project’s task dependencies, placeholder resource assignments and associated files are automatically created for new projects.
End User Steps:
Leveraging a template:
- Access a project,using a detailed view, that was created from a template (e.g. Project Overview).
- In the Work Plan Panel, highlight the project in the grid.
- Select Resourcing from the ribbon menu, then replace resource.
- In the Search for field, type in the placeholder resource.
- In the Replace with field, type in the identified resource staffed on this project specifically for the role matching the placeholder resource (e.g. Crystal Wright has a job title of Business Analyst and should be assigned to all work currently assigned to $SystemAnalyst).
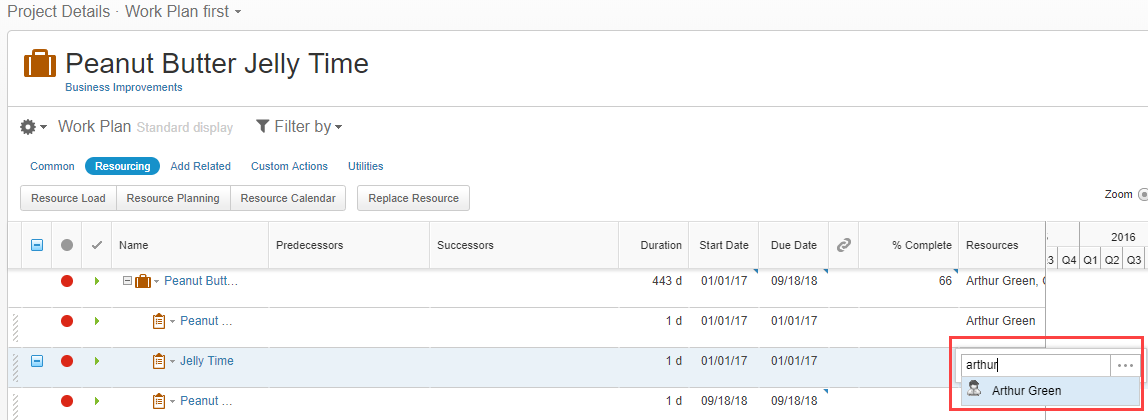
Non-template projects
- Access a project using a detailed view (e.g. Project Overview).
- In the Work Plan Panel, highlight the task in the grid.
- If not visible, add the resource column in the work plan view by going Gear Icon → Columns → Resources
- Simply type the name of the resource(s) and select from auto filled suggestions.
Example:
Templated Projects

Non-templated Projects
Resource balancing
Intended Role: Resource Manager
Description:
Once resources have been assigned to specific work items, resource managers constantly need to ensure individual resources are not overloaded. Leveraging Clarizen’s Resource Load module, resource managers can view load and availability for all individuals within their group. Furthermore, the Resource Load allows for real-time balancing through drag and drop to reassign work.
Admin Steps:
Add Resource Load to the Navigation Panel.
End User Steps:
- From the Navigation Panel, select the Resource Load module
- Click Groups I Manage (this entails that the Resource Load screen pulls into view all groups where you are the Direct Manager)
- In the gear icon, make sure you are in “Resource Load” (See image below)
- Select the following options (top left corner next to the gear icon). For a detailed description of the options available, see the Resource Load success article here.
- Set Grouping to “Groups”
- Set Effort View Type to “Planned Work”
- Set Load View Type to “Load”
- Set Units to “Hours”
- Set Time Frame to “Month”
- Expand hammock to see resources that belong to the group
- Expand hammock to see current projects assigned to each resource
- Take note of resources that can take are overloaded () and drag projects to other resources with availability
- (Hint: If you wish to have a conversation with the PM, it’s very easy to use the feature, found when you hover your mouse, to create a discussion on that project)
Example:

The screenshots are not visible. Can you repair the link to the pictures?