
Background
User provisioning is the process by which organizations create, modify, disable, and delete user accounts and their profiles across IT infrastructure and business applications, such as Clarizen One.
Provisioning tools are used to automate onboarding, offboarding, and other administration workforce processes, for example, new hires, transfers, promotions, and terminations.
Benefits
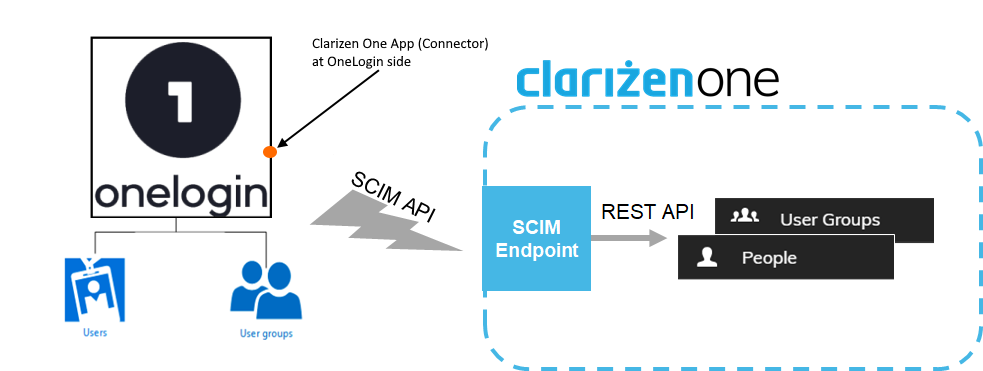
With Clarizen’s cloud-based user provisioning it is possible to create users and groups directly inside OneLogin and “push” (provision) them to Clarizen using the SCIM (System for Cross-Domain Identity Management) protocol.
This functionality complements Clarizen’s existing SSO (Single-Sign-On) solution to provide a complete Federated Authentication suite.
Features
- API key mechanism to authenticate SCIM-based user provisioning service
- Provisioning (creation, updating, and deletion) of users and groups in Clarizen
- Picking up existing Clarizen users to be managed by OneLogin
Note: Subject to proper configuration in OneLogin.
- Automatic mapping of predefined standard fields and entities:
- User Name
- Display Name
- First Name
- Last Name
- Office Phone
- Mobile Phone
- Direct Manager
- Job Title
Note: The automatic mapping is to an internal text field, which requires an additional workflow rule to further map it to the corresponding Job Title in Clarizen.
- Ability to include additional fields (string only) in the automatic mapping
Examples: “Country”, “Department”, etc. attributes may require adding custom fields and workflow rules to ensure proper mapping to a target entity in Clarizen. - Hard-coded “best provisioning practices”:
- Do not send invitation emails automatically
- Do not require admin approval before a user is Created, Deleted, or Updated
- When a synced user is deleted from OneLogin, delete the user in Clarizen
- When a synced user is suspended in OneLogin, suspend the user in Clarizen
- Currently, the following OneLogin provisioning features are not supported, but they may be in the future:
- Import groups
- Import users
- Sync password
Requirements
SCIM-based user provisioning is available to all Enterprise and Unlimited Edition Clarizen customers.
Configuration Instructions in OneLogin
Adding the Clarizen App
Log into your OneLogin admin portal and complete the following steps:
- In OneLogin, go to Applications.
- Click Add Application.
- Search for the ‘Clarizen SCIM’ application.
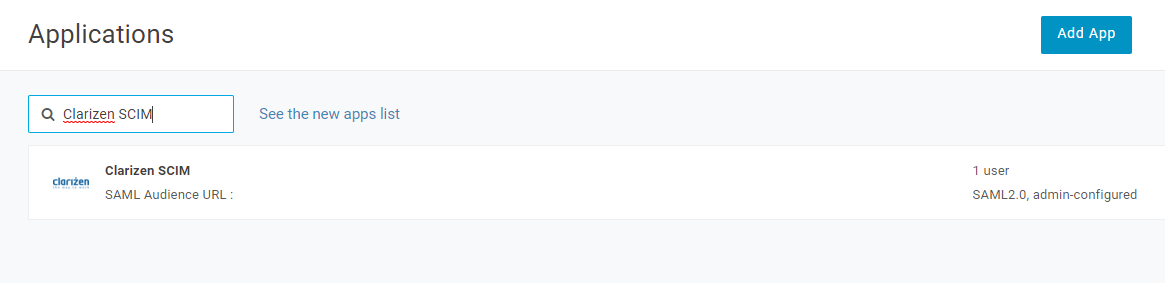
- Click Add.
- Inside the newly created app, start the setup wizard.
- Under Configuration, enter the Base URL as follows:
- US Production data center: https://servicesapp2.clarizen.com/scim/v2
- EU Production data center: https://serviceseu1.clarizen.com/scim/v2
- US Sandbox data center: https://servicesapp.clarizentb.com/scim/v2
- EU Sandbox data center: https://serviceseu.clarizentb.com/scim/v2
- Enter the SCIM Bearer Token.
Clarizen provides a dedicated API Key mechanism to authenticate SCIM-based user provisioning service. Refer to the API Key article on success.clarizen.com for instructions on how to generate an API Key for your newly created application. Once you get a key, simply paste it inside the SCIM Bearer Token. - Click Enable to verify that the connection is working.

Best Practices
- The integration user requires at minimum Lite Admin privileges because it is used to generate the API key to create users in Clarizen.
- The API Key contains information about the Clarizen instance where the key was generated, which indicates which instance to provision users to. If you use multiple OneLogin applications to provision several Clarizen instances, make sure you use the right key in each application.
Enable Provisioning Functionality
- Under the Provisioning tab, click Enable Provisioning.
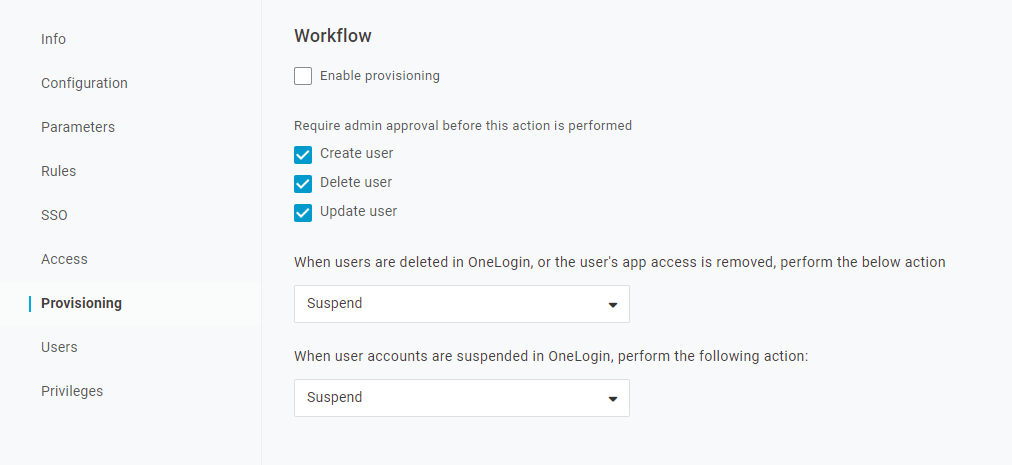
- Define Create User, Delete User, and Update User actions to define when an admin approval is required, and what happens when a user is Deleted or Suspended in OneLogin.
Set Up Mappings
Under the Parameters tab, define, modify, and review the user’s attributes:
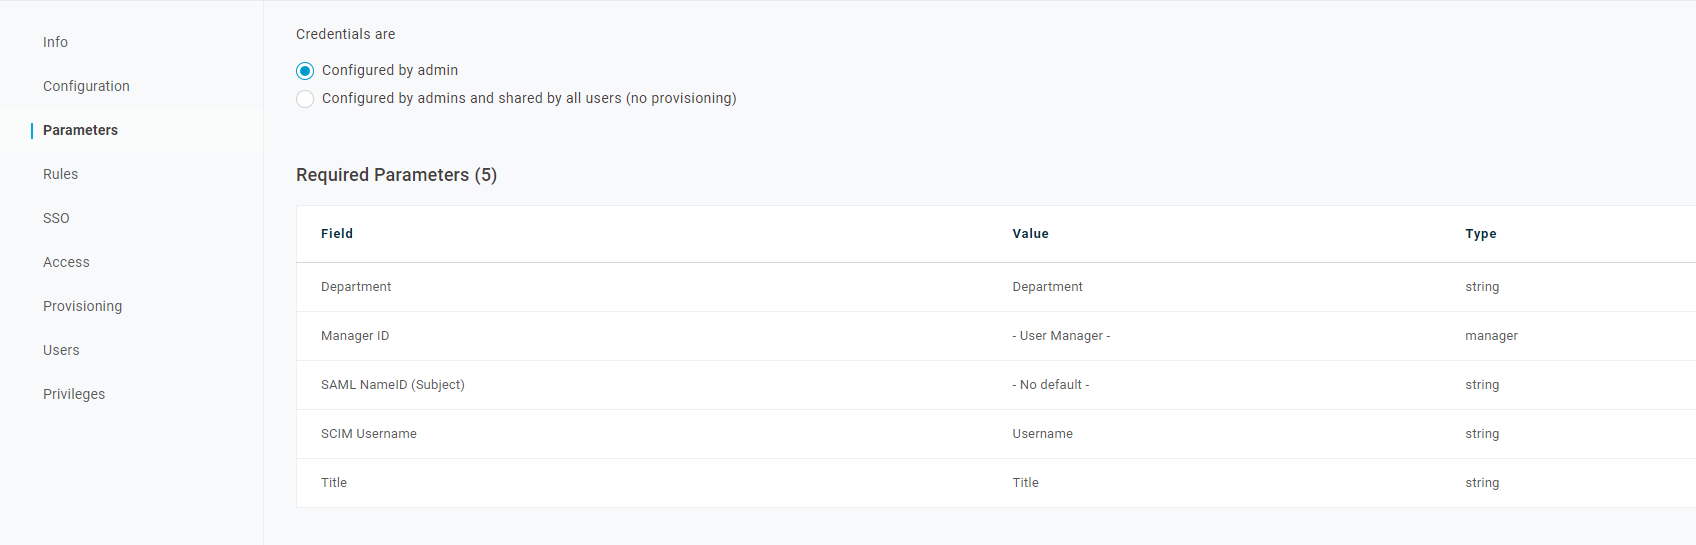
Although Clarizen supports the entire list of default attributes (for more details, see Initial Setup in Clarizen), it is recommended that you review the list of attributes and delete the ones that you will not be using in your integration.
The mappings in the Parameters tab defines how the internal OneLogin attributes are mapped into standard SCIM attributes, which are visible in your Clarizen instance. Save any changes you make.
For more information about picking up existing Clarizen accounts or SSO-related considerations, see the Best Practices section below.
Assign Users
At this stage, you can select which users (out of all existing users in your OneLogin account) will be provisioned by the newly created application. This operation is frequently referred to as “Assigning to a sync group”.
Open the Users tab and select Users:

Initial Setup in Clarizen
Predefined standard fields (see Features section above) are automatically mapped. However, you can change some of the predefined mappings or add new ones.
- In Clarizen, log in with an admin account, and go to Settings → Extensions. Locate the User Provisioning section.
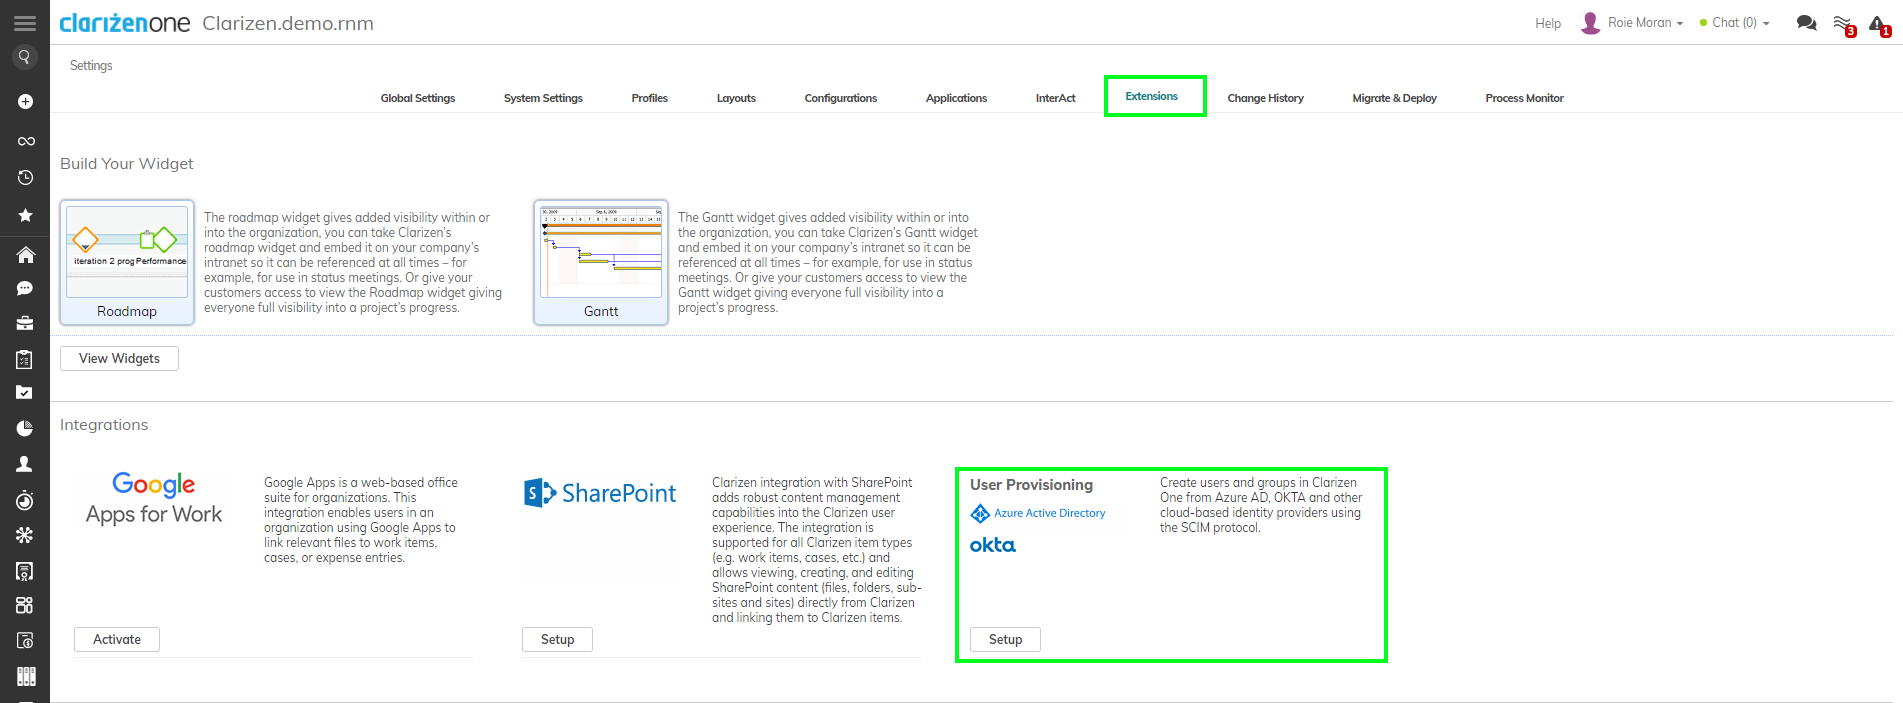
- Click Setup to view and define how the user attributes are mapped from your newly created application in OneLogin to the User entity fields in Clarizen:
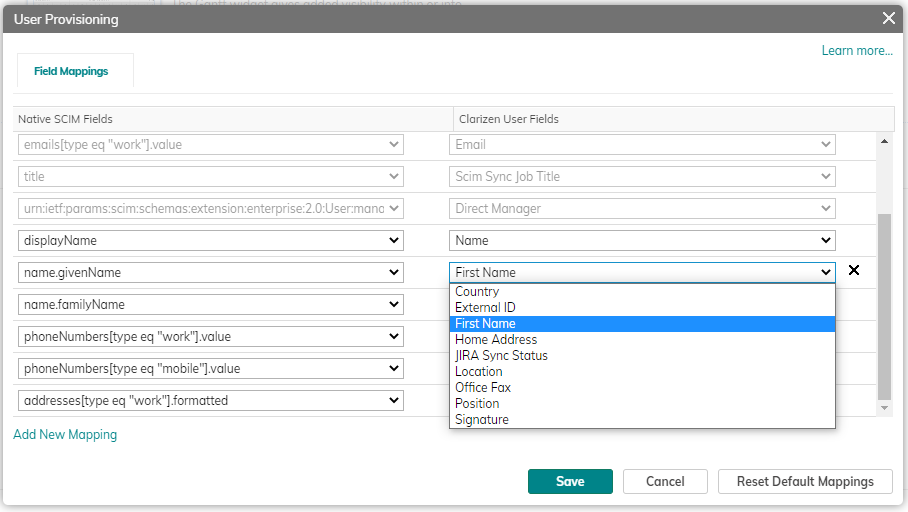
- The first few mappings are read-only and cannot be changed. You can change the rest of the mappings by clicking the corresponding item (on both sides) and selecting an alternative value from the list.
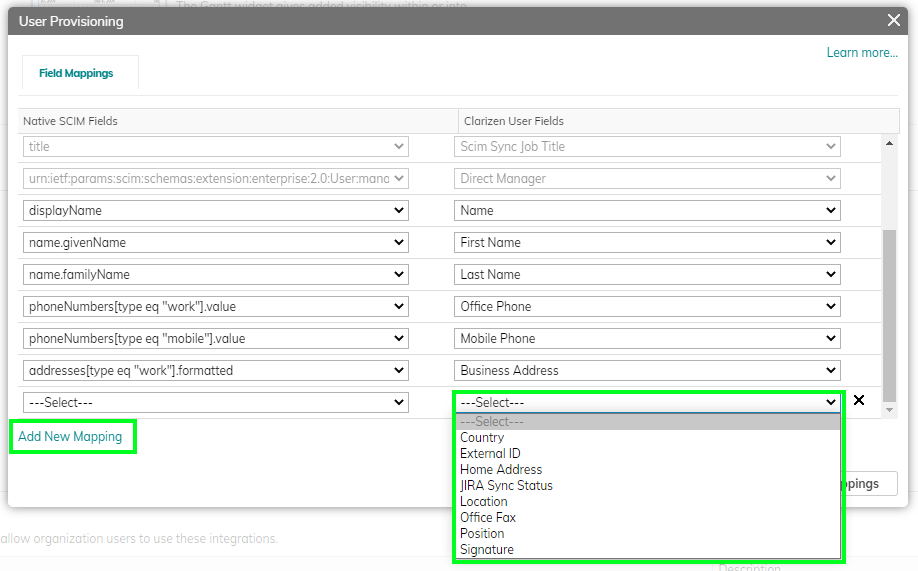
- To add new mappings, click Add New Mapping. It is possible to add mappings to any standard or custom field on the User entity in Clarizen.
- You can delete unnecessary mappings or restore default mappings.
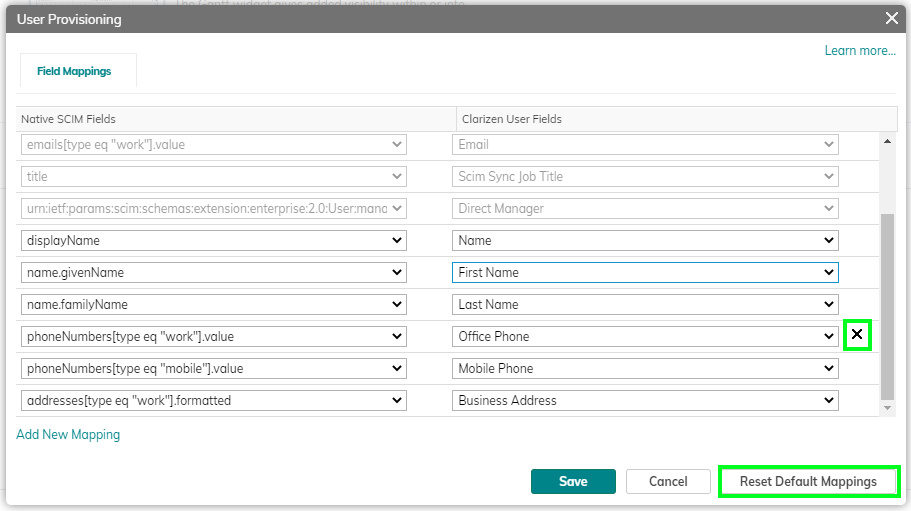
- Click Save when done.
Notes:
- Only mapping to textual (string) fields is supported.
- Refer to the Best Practices below for more information on how to provision "reference to objects" fields in Clarizen using an intermediate mapping to a textual custom field, which triggers a workflow rule to map it further to an object in Clarizen.
Default Provisioning/Deprovisioning Rules
During the User Provisioning process, the system will execute the following provisioning / deprovisioning rules:
- Do not send invitation emails automatically
- Require admin approval before a user is Created, Deleted, or Updated
- When a synced user is suspended in OneLogin, suspend such a user in Clarizen
- When a synced user is deleted from OneLogin, delete such a user in Clarizen
Best Practices
Picking up Existing Accounts in Clarizen
There can already be existing users that were provisioned manually in Clarizen.
To have OneLogin provision these existing users when you switch to cloud-based user provisioning, you must ensure the following:
- The names of the groups that are assigned to your user provisioning application in OneLogin must be the same as the names of existing groups in Clarizen.
- The value of the userName attribute of users, which will be provisioned by OneLogin (defined by the mapping you define - see Set Up the Mappings), is identical to the User Name of the existing user accounts in Clarizen.
If required, you can create a custom action (“update field” action on User entity) in Clarizen to update the user names of existing users.
Mapping to Objects in Clarizen
The best practice for mapping OneLogin’s user attributes to objects inside Clarizen (e.g. Job Title, User Groups, etc.) is to do it in two stages:
- Map the attribute to an intermediate textual custom field in Clarizen.
Note: For the “Title” attribute, there is a dedicated standard field (“Scim Sync Job Title”) that exists for this purpose. - Every time the intermediate field in Clarizen is updated with a new value from OneLogin, it can trigger a workflow rule, which will further link the corresponding user to the desired object in Clarizen.
Provisioning to Multiple Clarizen Instances
It is possible to provision several Clarizen instances from a single OneLogin account. These are the basic guidelines to keep in mind:
- There needs to be a dedicated enterprise application (connecter) in OneLogin for each Clarizen instance
- You need to specify the correct URL and Secret Token for each Clarizen Instance in its dedicated application (see Setting Up Provisioning)
Gradual Rollout
Automatic user provisioning is very powerful at scale.
Because it requires careful planning and quite an extensive configuration, we recommend starting small in a controlled environment (such as Sandbox or Testing), and checking every step and every critical scenario (such as picking up existing accounts) that you need to support.
Troubleshooting
Duplications and Conflicts
During provisioning cycles, the OneLogin portal checks whether each assigned user already exists in the target Clarizen instance. If a user does not exist in this particular Clarizen instance, OneLogin will try to create the user in Clarizen.
However if the User Name already exists in another Clarizen instance, the process will fail and the user will not be created.
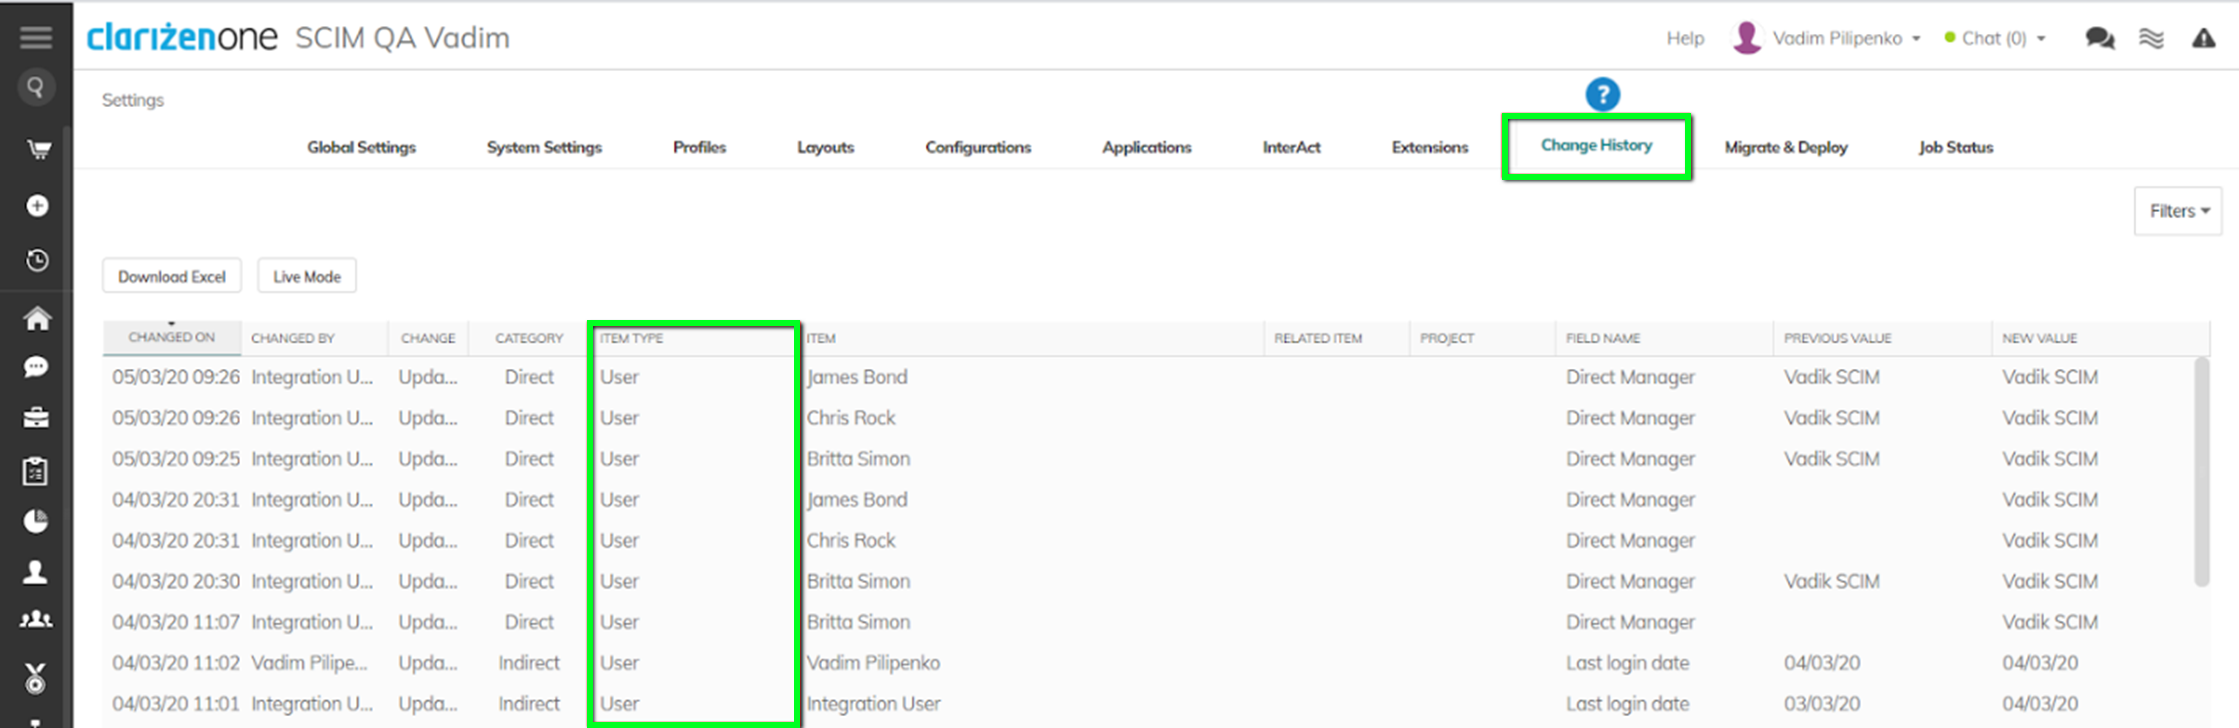
Provisioning Logs
To monitor/debug the user provisioning process, go to Change History in Clarizen settings.
Comments