
Discussions Overview
Discussions Overview
This page describes discussions in Clarizen and includes the following sections:
About Discussions
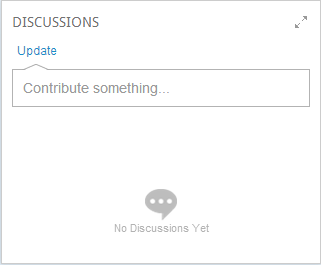
Figure 1: Discussion Pane
You can create new discussions and participate in existing discussions, including discussions on all items (such as work items, cases, files and more). New discussions can be initiated from the Discussions section of a Relations Panel of either Module view, Item Detail view, or from the Social module's Discussions Feed Panel.
New discussion groups are created (added) via the Social module's Discussion Group Panel and all users can create ad hoc private or public discussion groups (which are automatically discussion-able). Internal users are automatically added to the Clarizen out-of-the-box All Company group , and can join public discussion groups and user groups (based on system settings), therefore they will receive notifications on new group discussions.
All members of a public group can add new members to that group. Within the content of a discussion or reply, people can mention and attach other people and items in the system.
Hyperlinks, when added to a discussion, enhance the discussion by displaying a URL preview and enable you to attach links to videos located on the internet.
Additionally, people can either create or link items (such as new tasks) directly to, or from, discussions as well as link users or groups using the mention ('@') shortcut, and other items using the attach ('#') shortcut, and alert specific users or groups of discussions (also called posts).
Linking or 'mentioning' a discussion with an item (or items) enables viewing the discussion on the related item's Relations Panel.
You can even add images to the discussion using Copy & Paste of the desired image
Note:
Images added using copy paste are not saved as Clarizen files
Viewing a user’s related discussion panel enables seeing all discussions in which the user has participated, received a mention or was notified. You can Like a discussion.
About the Discussion Groups Module
Clarizen comes with two out-of-the-box views for the Discussion Groups module:
- Mine — All groups to which you are a member
- All — All available groups to which you can become a member
You can access the Discussion Groups module in two ways:
- The Navigation panel (visible when enabled in the profile from the Profile Settings)
OR - Clicking
 located in the Social module Groups Panel.
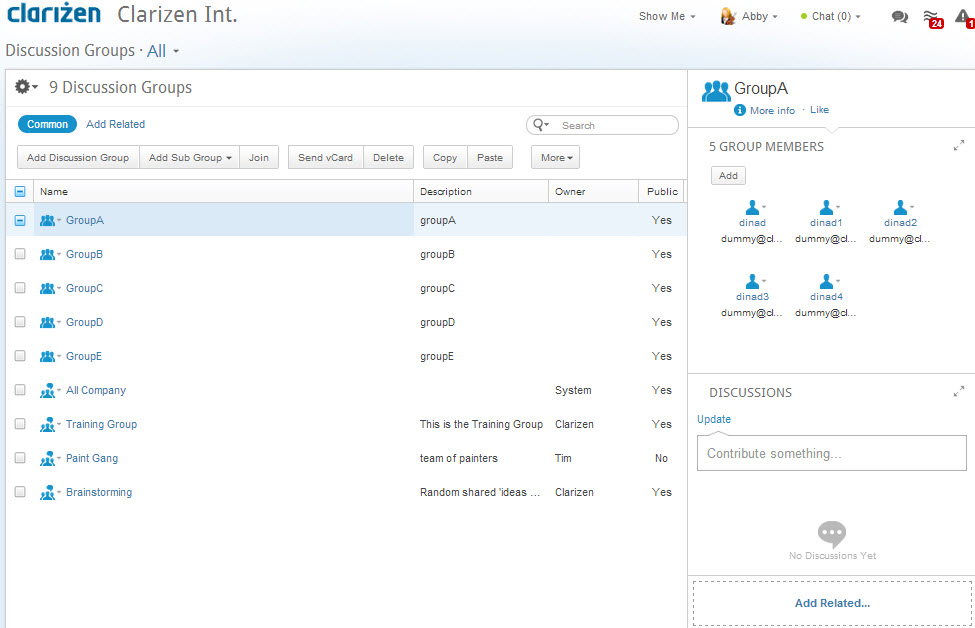
Figure 2: Discussion Groups Module'All' View
Discussion Groups views are like other Clarizen views, as they include a Relations Panel to enable adding,viewing and navigating relations ribbon to perform actions and the ability to manage columns, expand panels, etc.
Note:
The ribbon options available for user group views differ from ribbon options provided in discussion groups views.
Discussion Groups Detail View
A Discussion Groups detail view is like any other Clarizen Item Detail view, in this case; a view focusing on the discussion group 'All Company'.
The Item Detail view can be edited to reorder, add, or remove panels, define column set etc.
Editing of the discussion group view is done by the Admin in the profile setup.
The Admin user can create multiple views also in the profile setup, however only one view defined as part of the view permission, is available for each profile.
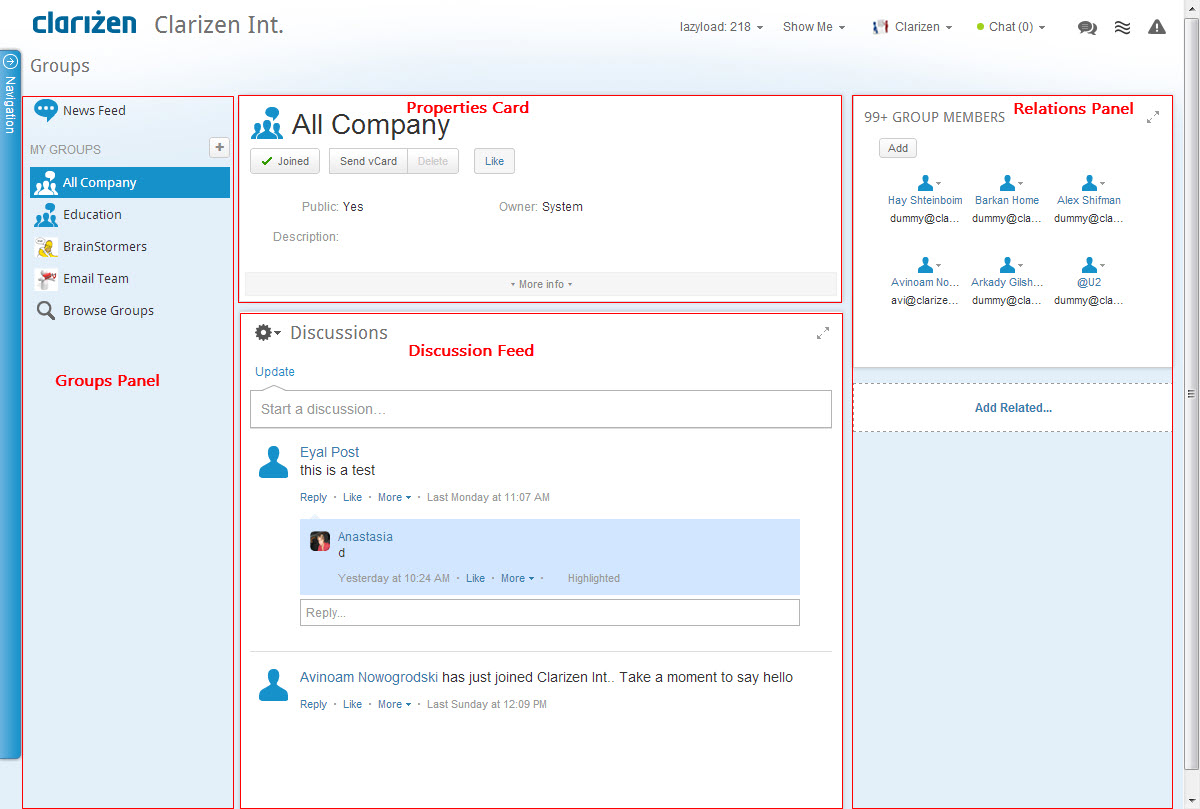
Figure 3: Discussion Detail View
Each panel in a Discussion Group's detail view has the  Expand Panel control (except the Properties Card which has a 'More info' link), to enable expanding the specific Discussion detail view panel.
Starting New Discussions
Starting New Discussions
This page describes creating new discussions and includes the following sections:
About Discussion Containers
When a new discussion is started, a dedicated 'container' is created representing the discussion context.
The container impacts on a discussion in the following three ways:
- The discussion's context — If a Clarizen discussion does not appear inside a container, the container appears adjacent to the writer.
- Permissions — Users able to see the container also have permission to see the associated discussion(s).
- Delete function — When a discussion's container is deleted, so are all the discussions contained.
Starting a Discussion
- Click

The Navigation Panel opens. -
Select Social .
The Social module opens, is selected (DEFAULT).

Figure 4: News Feed Discussion
- Click inside the Update field to start a public News Feed discussion.
OR
- Select a group to start a discussion.
- Click
 to define the following settings:
- Show
- All —The discussion is public and can be viewed by all internal users
- Following —The discussion is private and can only be viewed by group members
- Post
- Rich Text —Supports MS Word RTF internal markup/format for importing and exporting, etc.
- Plain Text — Supports ordinary text
- Enter text to the discussion field.

- Use ' @ ' — Link users or groups to the discussion by first entering @ ( the ' Mention' shortcut) into the text field
- Use ' # ' — Link items to the discussion by first entering # (the ' Attach' shortcut) into the text field
- Create a link to an external web site by entering a URL
- Paste an image copied into your clipboard
- Click Add Task to open the Add Task window.
- Click Add Other to add Related items.
Figure 6: Add Related Items
- Click Notify to open the Notify field.

i) Click  adjacent to the Notify field. The Select Groups Or Users multi-find window opens.
ii) Configure the multi-find window as necessary.
- Click
 to select additional groups:
 is available when starting News Feed discussions.
i) Click  adjacent to the field. The Select Group multi-find window opens.
ii) Configure the multi-find window as necessary.
- Click

The discussion group members are notified as follows:
- A temporary pop-up notification is sent to each member
- A new Group Discussion is indicated in each Group member's Activities Today
- Group subscribers, Users included via the '@' tag or added to the Notify field are notified via email.
Replying to Discussions
Replying to Discussions
This page describes replying to discussions and includes the following sections:
About Replying to Discussions
Clarizen notifies you of all new and/or on-going discussions occurring for either items you are a follower of, or in User Groups or Discussion Groups of which you are a member of, via the methods listed below:
- The Activities Today
- The News Feed
- A Pop-up Message (if currently online)
- Email notifications (for discussion subscribers)
Replying to a Discussion
Example:
The Activities Today indicates new post items (discussions) :

Figure 7: Activities Today
- Click
 .
.
The What's New window opens. The discussion appears as a link.

Figure 8: What's New Window
- Click a discussion link.
The Discussions window opens.
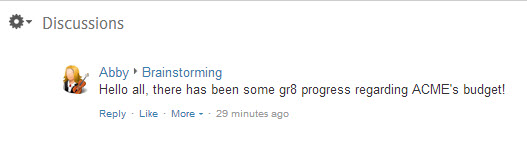
Figure 9: Discussion Window
- Click
 .
.
The Reply field opens.

Figure 10: Discussions Reply
- Enter your reply.
Optional: Add tasks or related items, attach files, notify or mention people as necessary.
- Click

The reply is added to the discussion, each group member's Activities Today updates and notifies of the new post
item (discussion reply) .
Liking Discussions
Liking Discussions
This page describes 'Liking' a discussion and includes the following sections:
About Liking Discussions
Users can Like discussions and discussion replies. Liking discussions has the effect of adding an indicator item type or 'counter', and can assist project managers to gauge a discussion's popularity on the amount of Likes received.
Once a discussion or a reply is Liked , a value indicating how many Likes were received is displayed adjacent to the 'thumbs-up' symbol.
Likes behave like any other related items in Clarizen customizations.
Once Likes have been enabled by the relevant system setting, y ou can add a new Like item between a user and the following other items types in Clarizen:
- Discussion Message (Post, Reply)
- Work Item
- Cases
- Expense Sheet
- Expense
- Customer
- File
- User Group
- Discussion Group
- Job Title
- Skill
Like a Discussion
Example:
The Activities Today indicates new post items (discussions):
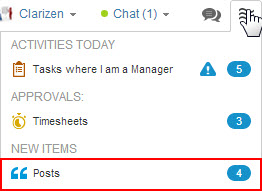
Figure 11: Activities Today
- Click "Posts .
The What's New window opens. The discussion appears as a link.
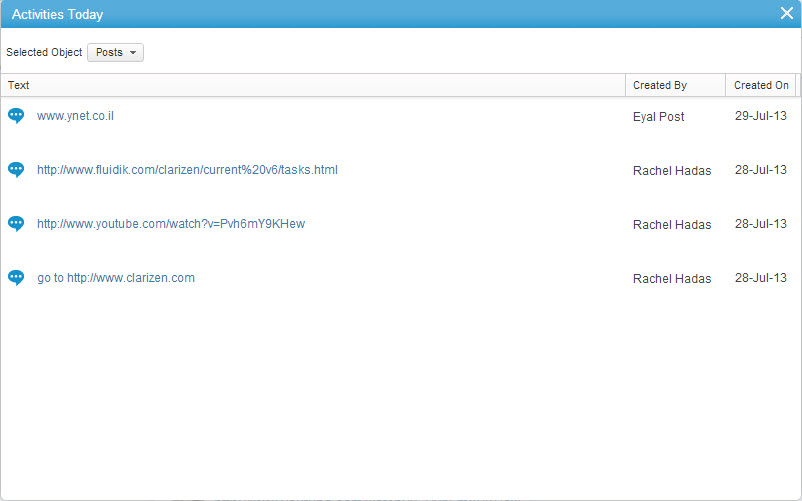
Figure 12: What's New Window
- Click a discussion link.
The Discussions window opens.

Figure 13: Discussion Window
- Click

The changes to
Viewing Discussion Likes
- Hover the mouse pointer over the value adjacent to
 .
.
A pop-up opens displaying the names of those who Liked the discussion. - Click the value for more options.
The People who like this window opens listing the names of users who Liked the discussion.
A button to Follow users is located adjacent to the entries in the window (except yours, if present).
The Contextual Search is available when multiple entries are listed, and searching is required.
Following Discussions
Following Discussions
This page describes 'Following' a discussion and includes the following sections:
About Following Discussions
Following an item such as a discussion happens either automatically (for team and group members) or is defined manually. You can choose to Follow any discussion in order to receive notification on discussion updates and project progress. When you Follow a discussion, all of that discussion's posts update in the following locations:
- The News Feed
- The Activities Today
- Email notifications (subscribers only)
Follow a Discussion
- On the Social module, click
 located at the base of the Discussion Groups Panel .
The Discussion Groups module opens. - Ensure the All module view is selected (or select it via View Navigator).
- Click a group name in the grid.
The discussion group opens, its discussions (if such exist) are displayed in the News Feed.
(If no discussions exist , select a discussion group with discussions.)
- On the discussion panel, click
 , and ' Follow' .
You are now Following this discussion. You are updated on discussion entries in Activities Today, in the News feed and via email (if you are a discussion subscriber) as they occur.
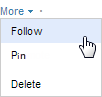
The Discussion Panel's 'More' drop-down menu includes the ' Unfollow ' option.
Pinning Discussions
Pinning Discussions
This page describes Pinning a discussion and includes the following sections:
About Pinning Discussions
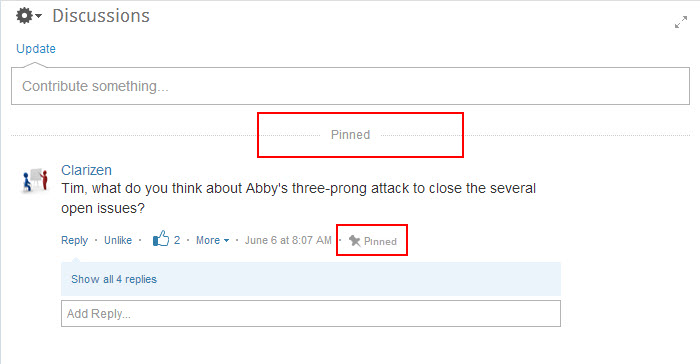
Pinning a discussion has the effect of promoting the discussion.
When a discussion is Pinned, the discussion location in the panel is shifted to the top (upon screen refresh ) .
Pin a Discussion
For the following exercise procedure, we access a discussion via the Discussion Groups module, however one can access discussions from a view's Relations panel, the Social module or via the Activities Today (for new discussions).
- Click
 located at the base of the Discussion Groups Panel .
The Discussion Groups module opens.
- Ensure the All module view is open (or select it via View Navigator).
- Click a group name in the grid.
The Group Discussion Item Detail view opens showing discussions, if such exist.
(If not, select a discussion group with discussions.)
- On the Discussions pane, click
 , and ' Pin' .
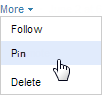
The discussion location in the panel is shifted to the top (upon screen refresh ) .
The symbol is displayed under the initial discussion entry.
Highlighting Discussion Replies
Highlighting Discussion Replies
This page describes highlighting discussion replies and includes the following sections:
About Highlighting Discussion Replies
Highlighting a reply in a discussion has the following three effects:
- The reply is color is different.
- An indicator tool-tip appears when the mouse pointer is hovered over the 'Highlighted' symbol, indicating who highlighted the reply, and when .
- The last highlighted reply is displayed when the entire current discussion is 'collapsed' in the News Feed.
A ' Show all (value) replies ' link shows the number of replies. Clicking the link expands the entire discussion to show that discussion's replies; the highlighted replies first and then those added in subsequent chronological order.
Highlight a Discussion Reply
- In the Social module, click
 located at the base of the Discussion Groups Panel.
The Discussion Groups module opens.
- Ensure that the All module view is open (or select it via the View Navigator).
- Click a Group name in the grid.
The Group Discussion Detail view opens showing a discussion with at least one reply, if such exists.
(If not, select a discussion group with a discussion with a reply.)
- If necessary, in the discussion container, click the ' Show all (value) replies ' link to expose replies.
- In a reply, click
 and then ' Highlight' .
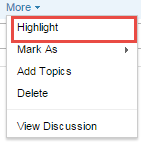
Upon screen refresh, the reply is highlighted under the initial discussion entry.
 is displayed under the discussion reply.
Previewing Discussion Images
Previewing Discussion Images
This page describes previewing image files added to discussions and includes the following sections:
About Highlighting Previewing Discussion Images
Previews of images added to a discussion can be previewed directly in the feed. In other words, viewing images added to
discussions without having to navigate (drill down) to the actual image in order to understand what is attached.
Preview an Image File
- In the Social module, navigate to a discussion with an image file attached, visible in the Feed.
If such is unavailable, attach an image file to an existing discussion by clicking Reply , Add Other , and then the Files icon.
Alternatively, Clarizen supports 'Drag-and-drop' to add files.
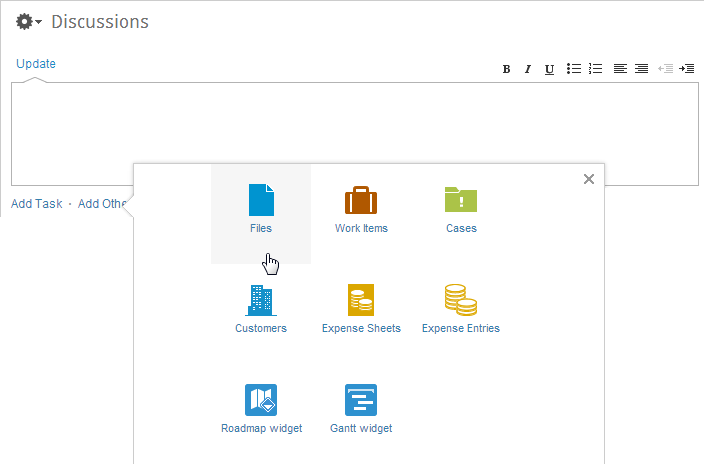
Figure 14: Attach Image File to a Discussion
- Hover the mouse pointer over the image in the Feed.
The mouse pointer becomes
- Click the image.
The image opens in a File Viewer. Tools located in the upper-left-hand section enable zooming, annotating and downloading the image.

- Clicking
 opens the Annotation tools.

Click here for more on viewing files in the File Viewer
- Click
 located in the viewer's upper-right section to expand the Comments & Markups column.
 - Click
 , located above the
  control, to close the preview.
Comments