
This page describes resource management in Clarizen and includes the following sections:
Resource Management
About Resource Roles
Clarizen resources are dynamically assigned roles in projects when they are added to projects.
A specific user may have multiple roles within a project or across multiple projects, and can easily filter through work items based
on their given roles.
- Click here for information on roles in Clarizen
About Resource Load Views
The Resource Load view shows work assignment and the planned workload for the selected resources day-by-day in accordance to the original planned work and also by remaining effort.
The view also sums up the load (in units or hours) for the resource, project and group level.
Monitoring Resource Schedules
A resource's Clarizen calendar (Resources Calendar) graphically illustrates resource allocation over time.
The calendar provides an overview of resource usage within the organization for project managers, work item managers and Admin users.
The Resources Calendar can be most helpful during the initial planning phase, as well for reviewing resource allocation during the execution phase of a project. Additionally, the personal calendar is useful for detecting resource overloads.
A resources Clarizen calendar is accessed via the resources Properties card.
- Navigate to the People module and select a user in the grid .
- Click
 located in the Relations Panel.
The resources Properties card opens. - In the Personal Details pane, click Edit located adjacent to 'Calendar'.

Figure 1: Properties Card Personal Details Pane
The resources Clarizen calendar opens.
Assigning Resources
Assigning resources by managers to a work item is achieved either via the Add Related Resources ribbon option, available in all work item modules and Work Plan panels, or via the Add Related link located within Relations Panels.
- Click Add Related, Resources .
Ribbon:
Relations Panel:
The Add Resources multi-find window opens.
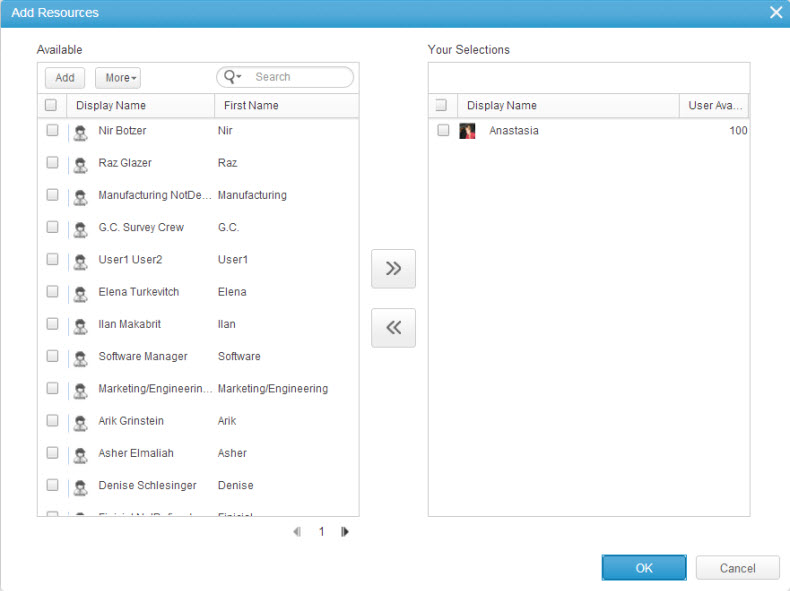
Figure 2: Add Resources Multi-find Window - Configure the window as necessary.
- Click

Resource assignment is achieved.
- Click here for information on team-centric views used for assigning resources to work items
Resource Load
This page describes the resource load views and behavior and includes the following sections:
- Overview
- About Resource Load View
- Related System Settings
- Launching Resource Load View
- View Options
- Adding a User/Group to the View
- Navigating Overloaded Resources
- Reassign Resources
- Exporting Data
Overview
Resource management is all about balancing the capacity and demand of people, so that you don't have benched or overloaded resources, thereby ensuring full resource utilization.
The Resource Load view is the one stop shop for your resource management needs, providing a fully interactive and updateable reporting tool that allows you to simulate load by quickly filtering work items in and out, view loads by individual resources or groups, drag and drop to reassign tasks and projects. You can also review the full project plan for the projects where resources are assigned tasks, so that you can see the impact of any schedule changes made.
The Resource Load is the definitive tool for resource management, that aids in the exercise of balancing your resources and workload, by providing not only visibility to where resources have capacity, but also provide a means to update and reallocate work on the same page.
The Resource Load is a true work tool that aids in the balance and management of your resources and helps you understand what your team has the capacity to work on, and when.
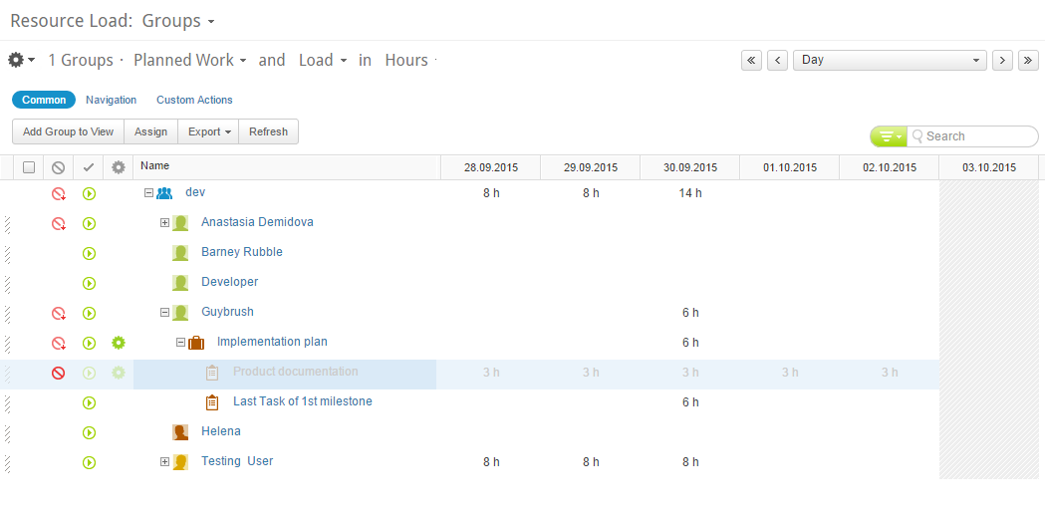
In the example shown below, Guybrush is shown to be overloaded in October with 92 hours in total.
Clicking the + sign next to the resources name reveals the projects the resource is assigned to, clicking the project shows the actual tasks assigned as well.
Notice how the hours are aggregated from the individual tasks to project and then to the overall work assigned to the resource.
Overloads are indicated in red. When viewing the load on groups, skills, or job titles, if at least one user is overloaded, an orange indication will be displayed on the group level.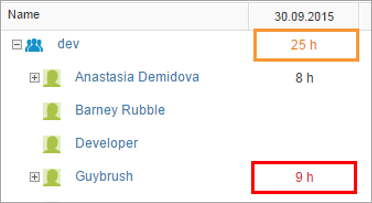
You can further investigate by clicking the magnifying glass on the month (or project) to drill down to a weekly view and again to drill down even further to a day by day review.
Now that you have established the source of the overload, you can reassign resources to relieve the load from Guybrush as explained below.
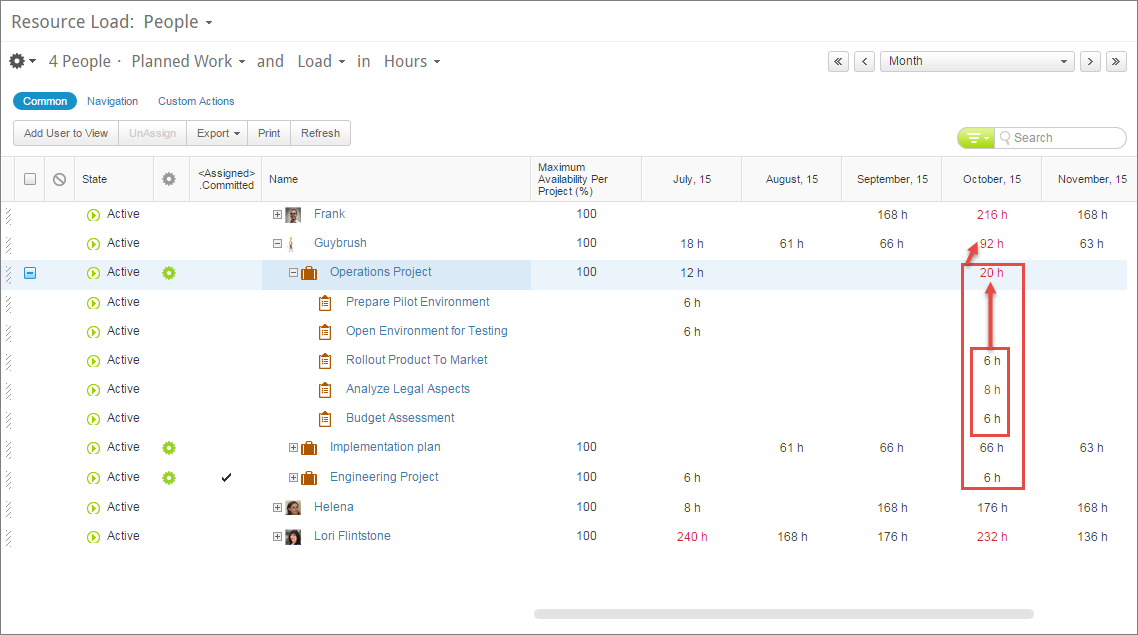
Figure 3: Resource overload example
About The Resource Load View
The Resource Load view shows work assignment and the planned workload for the selected resources day-by-day in accordance to the original planned work and also by remaining effort.
The view also sums up the load (in FTE, Person (man) days, units or hours) for the resource, project and group level.
The Resource Load view enables you to:
- See resource assignments per Task and Project for a period between 2 and 52 time frames
- Easily identify group overload including partial load indication, which you can then drill down to the resource level
- Quickly identify the capacity and work load for each resource based on job title, user group association, or skill
- Detect individual resource overload and see the level of the over-allocation
- View and update any column from the work item, user, or resource directly in the resource load
- Create a split view display showing the work plan below the Resource Load table, for a specific project or task
- Freeze columns in order to maintain context of users and work items while analyzing load across time periods
- Drag and drop work items between team members to distribute assignments and balance the load more evenly between resources
- View data by Planned work or Capacity, and units in FTE, Person (man) days, hours, or % allocation
- Run Custom actions on users, groups, or work items from the resource load
See also Resource Management Best Practices.
Related System Settings
To display parent work items and to view load variance according to Remaining Effort, your organization's Admin user must ensure that system settings 8.5 and 8.6 are set to 'ON'.
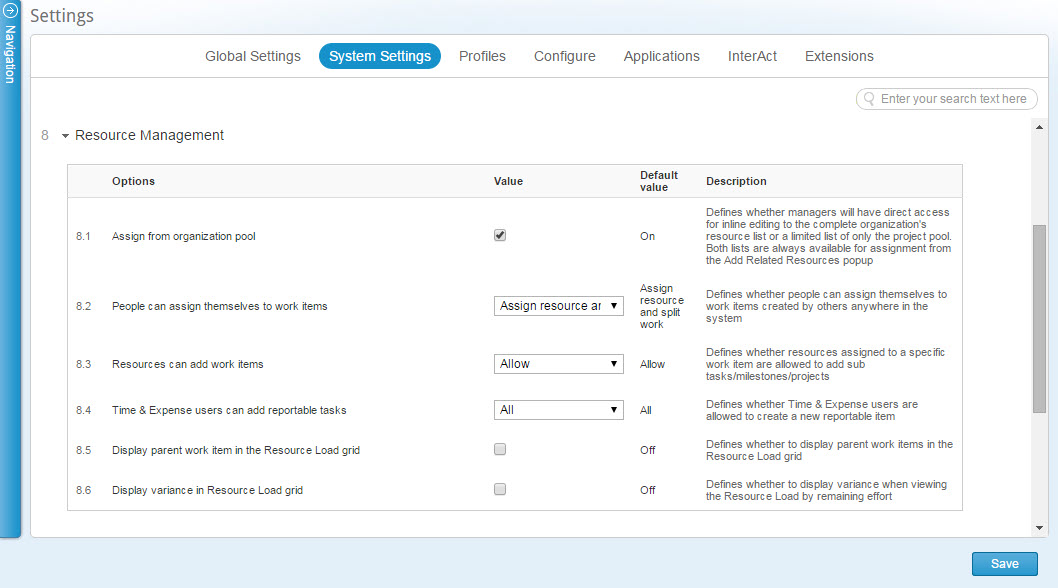
Figure 4: Resource Management System Settings
Launching Resource Load View
The Resource Load view can be accessed from the following modules, by clicking  and
and  :
:
- Work Items module
- Projects module
- Tasks module
- People module
- Milestones module
And from the Skills, Job Titles, Discussion Groups, and User Groups module by clicking from the  menu.
menu.
The Resource Load view opens.
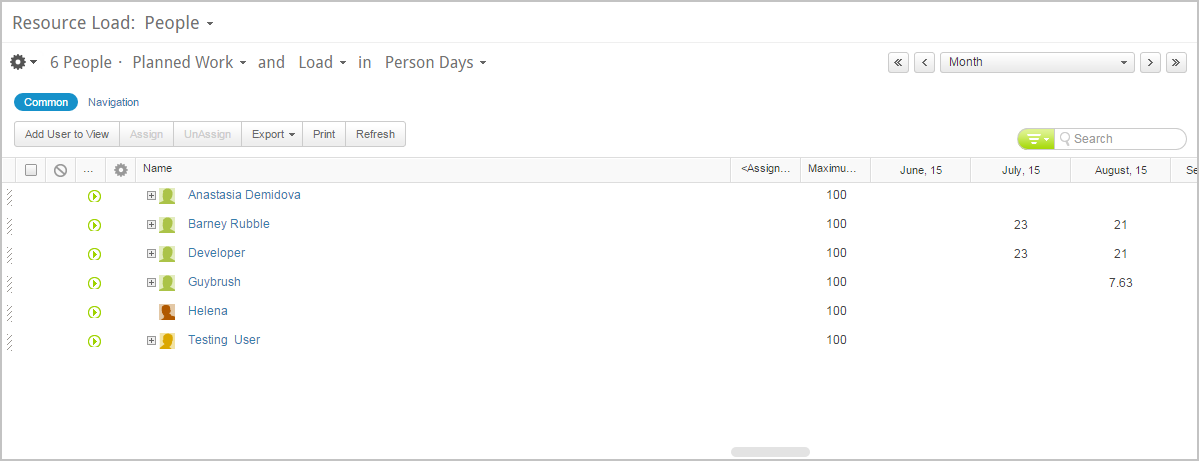
Figure 5: Resource Load general view
View Options
The view options allows you to determine what the resource load view displays and includes the following options:
Grouping
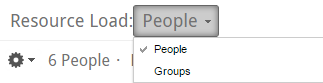
The grouping selector allows you to switch between the 'People' load view, displaying the load at the resource level, and the 'Group' load view displaying the load at the group level.
- Toggle between People and Groups to change the grouping
Effort View Type
The effort view type selector allows you to switch between Planned Work and Remaining Effort views.
When selecting Remaining Effort, it will show the load based on the remaining work. All work items already past the due date that still have remaining effort will be reflected on 'Today'. This is done in order to show the remaining effort according to your organization's work policy.
- Toggle between Planned Work and Remaining Effort to change the effort view type

Note: Due to the fact that Remaining Effort can only exist in the future, you may see the remaining effort in the next time period. For example, if today is 22nd of November, that means November is 22nd of November to 21st of December and the remaining effort will be appear for December.
Load View Type
The load view type allows you to switch between displaying actual work load and resource availability.
Switching to 'Availability' will show how under-utilized a group or specific person is, allowing you to quickly analyze how much, if any, additional work you can add.
- Toggle between Load and Availability to change the load view type
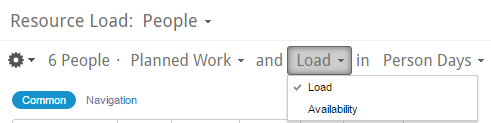
- When 'Load' is selected, the display will show the total load on a user or group rolled up from individual tasks
- When 'Availability' is selected, the display will show the remaining availability on a user, calculated by subtracting the assigned work from the total hours a user works in any given date (as set in the user's calendar)
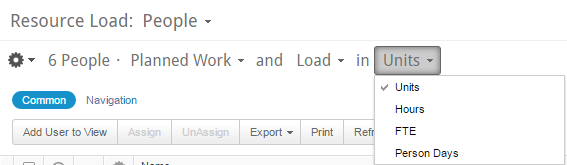
Units
The Units selector allows you to define what unit you wish to see for the load calculation, the available options are:
- Units – shows the load status in percentages (%)
- Hours – shows the load status in hours
- FTE – shows the load status in FTE (Full Time Equivalent), calculated by dividing the units a user is assigned to on a task by 100 (Units/100). The units on a task is based on the total working hours of a user from the user's calendar
- Person (man) days – shows the load status in Person days, calculated by dividing the hours a user is assigned to work on a task divided by the total working hours on the organization level (hours/hours per day from organization calendar)
- Toggle between the unit options to select the required view
Time frame
Define the time frame on which to calculate the work load, the period calculated can be set between 2 and 52 days, weeks, or months, you may also define a custom time frame.
To define the calculated time frame:
- Click the time frame menu located on the top right of the resource load window
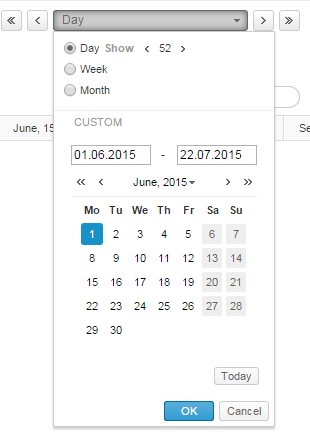
- Select the time frame to be used:
- Choose between Day, Week, and Month
- Define the period to show using the Show arrows (between 2 and 52)
Alternatively, type in the period desires or use the calendar view and associated arrows to select a custom time frame
Note: Any value selected will remain in memory until you change it manually. For example, if you've selected 10 under days 6 for weeks and 12 for months, you can switch between the time frames while maintaining the period.
Note: If you've made a selection for the time frame you can choose only the start or end date in the custom fields (or calendar) and the system will use the values selected to define the time frame unless you choose to enter both the start and end date manually.
- Click
 to approve your selection
You can also use the left and right arrows adjacent to the menu to scroll between time frames based on the selected options above.
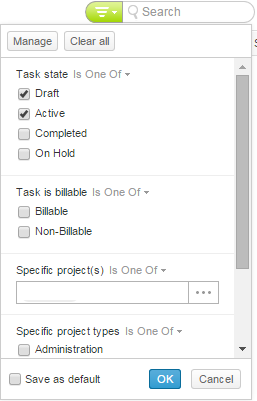
Search and Filter
In addition to the time frame filter, the resource load view supports a variety of search and filters to better locate the information you require:
Quick Filter
Work items can be easily included/excluded from any level, which will affect the calculation of the Resource Load.
Excluding tasks updates the calculation to give you a better picture of how to allocate your resources
To exclude a work item:
- Click the
 icon directly in the grid
 - Excluded work items are marked by

Once excluded the work item is grayed out, and its load no longer rolls up into the project, user, or group level - Rows with several work items where one or more items are excluded are indicated by the
 icon
icon
Excluded work items can also be seen in the filter pane
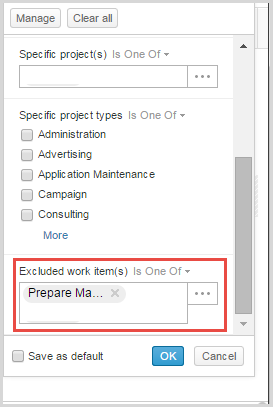
Additional filters
In addition to the quick filter, columns from any field from the work item, user, or resource link can be added into the table or directly into the filter pane, once added, filters can be applied to the fields which can affect the load, allowing for more precise load scenarios.

Search Bar
True to Clarizen's user experience the search bar is also available where you can include any string in the search bar to narrow the results based on your selection.
View management
You can control the way the resource load is displayed even further by opening the management menu.
- Click the Gear Icon

The Manage menu drops down.
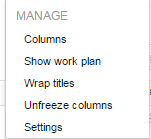
The available management options include:
- Columns management
- Load based on Project Assignment
- Show work plan
- Wrap titles
- Freeze/Unfreeze columns
- Settings
Columns
Define the columns that will be available in the Resource load table.
- Click Columns to open the Choose Fields window, see Column Sets for further details
Load based on Project Assignment
Shows the load based on Project assignment rather than by Task assignment. Choosing how to show the load does not affect which Labor Budget option you defined for your projects.
Show work plan
Define whether to allow a split screen view displaying the work plan when selecting a project or task in the resource load view.
The split screen view is only available if a project or task is selected in the resource load screen
If the split screen is active the work plan setting options are added to the view management menu.

Wrap titles
Define whether to wrap the text in the column headers
Freeze/Unfreeze columns
For a clear view, you can freeze the Name column so any column to the left of the Name column will remain frozen as you scroll through the resource load dates using the horizontal scroll bar
Settings
Define the start date and duration policies, controlling the calculation of the schedule properties for the task assigned to the resource
- Click Settings to open the Settings window
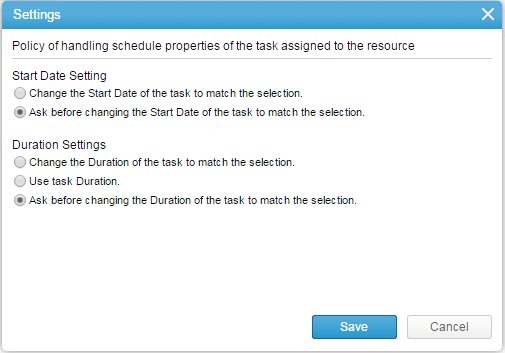
- Define whether to change the task start date to match the selection automatically or to request approval before any change
- Define whether to change the duration based on changes made automatically, to use the task's duration as a basis, or to request approval before any change
- Click
 to save your selection and close the Settings window
Adding a User/group to the view
You can manually add users or groups (based on the User level selected) to the resource load view.
To add a user/group:
- Click
 or
or  to add new—or remove existing—resources to the report.
The Add People/Groups multi-find window opens. - Configure as necessary.
Note: Resources can be removed or added back to a reports at any time.
Navigating between Overloaded Resources
You can easily navigate between overloaded resources to quickly find problematic loads.
To navigate between resources:
- Click

- Use the
 buttons to scroll and jump between overloaded resources
REASSIGN RESOURCES
You can reassign resources to various tasks and projects directly from the resource load screen.
Note: This functionality can also be used to replace placeholder resources with named resources. See Resource Management Best Practices and Inviting New People.
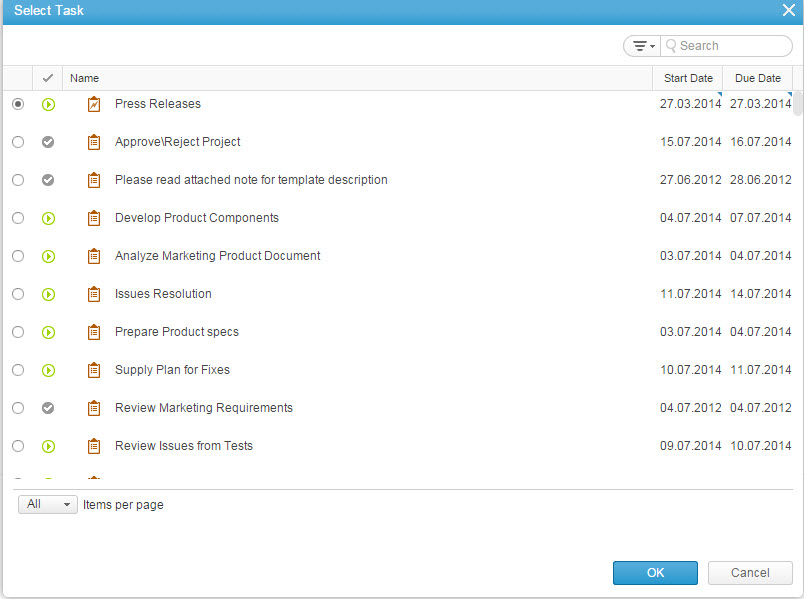
Use the common menu Assign and UnAssign buttons to reassign resources to work items. Clicking the buttons when on a user will open the Select Task window where you can select a task you wish assigned to the resource.
Alternatively you can drag and drop work items and people in the resource load screen to reassign and add resources to work items.
Below are the different drag and drop options and their results:
- Drag and Drop a Task onto a User
When dragging and dropping a task from one user onto another, it will replace the original user with the new one - Drag and Drop a Project onto a User
When dragging and dropping a project from one user onto another, it will replace the original user with the new one on all the relevant project's tasks - Drag and Drop User onto a Task
When dragging and dropping a user onto a task, it will add the user as a task resource - Drag and Drop User onto a Project
When dragging and dropping a user onto a project, it will add the user into the project pool

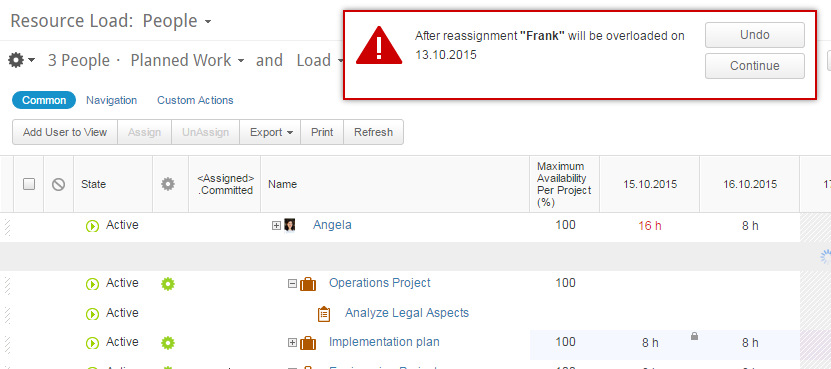
A confirmation message will appear confirming the change:

A warning appears if the change made will cause the resource to be overloaded, including an indication on the specific day they will be overloaded:
Exporting and printing Data
The resource load view can be easily exported to an Excel file or printed.
To export the resource load data:
- Click Export
- Select whether to send the exported Excel by mail (via Clarizen) or download the file to your computer
Note:
Clarizen supports Excel 2007 and above.
To print the resource load data:
- Click Print
The print preview window opens - Review the data
- Click Print to complete the process
The Link to the Team-Centric view listed above is not working.
Thank you for bring that to our attention, we will fix it right away.
@Boris - Hi. is it possible to share the resource load view at all? Or any resource utilisation views for that matter?
Hi Chad,
At the moment, we do not support that feature. Do you want us to create a feature request regarding that? Thanks!
yes please. How do I submit feature requests going forward?
Hi Chad,
If you want to submit feature requests, please post them on this link:
https://success.clarizen.com/hc/communities/public/topics/200269468-Share-Your-Ideas-Suggestions
Hi all,
Is it possible to delete a specific resource through a workflow ?
Amir,
Yes, work flow rules have the ability to remove objects. Note that you are not deleting a resource but would be 'unlinking' the resource from the related item (i.e. Project or Task).
I've spent tens of hours trying to figure out how to do really basic things in Clarizen and I still don't understand.
I have a project, it has a task, a resource completes it, I want to see a time sheet to approve. I don't know how to get that basic thing to work.
Ari,
Let me provide you some resources to help alleviate some of the frustrations you are currently experiencing..
1. Join our free Webinars to learn about the product. You can choose which Training Webinars you wish to watch by going to the following website: http://www.clarizen.com/live-demo.html.
I strongly suggest the Power User PM Part 1 & Part 2 Training Webinars. These walk you through the product and how to do the "basics". Once you have the foundation, you will have a better understanding of what you need to do.
2. Understand your Use Case. What are you trying to do? If you are just opening Projects and Tasks without understanding Best Practices and what your workflow should be, you will likely not have a positive user experience.
3. I also suggest our Office Hours Webinars, specifically Tips & Tricks as they are live Webinars that allows you to either listen to other people's questions or ask your own questions to a Professional Customer Success Manager or Professional Services Engineer that can readily assist you with your questions. You can follow the link above to register for these free Webinars.
As a PM, how do I submit a resource request for my project to resource managers? eg. BA requested - Jun 25%; Jul 50%; Aug 50%; Sep 25%; with skills life insurance, producer compensation and business process modeling
This would need to be as a structured request (not just an email or IM) so that the status of many requests across the organization can be tracked and managed
This can be done as a Custom Action on Request item type. The Custom Action would have all the relevant variables that you would want to include including a description explaining how you want the resource allocated. Then you can either manually assign to PM's based on the Project you are trying to allocate resources for or you can use a Workflow Rule that will assign to PM accordingly.
Hope this helps.
Thank you, I will look into that approach
Hello,
Is there a way to have Clarizen automatically assign resources to tasks for an optimal scheduling of the project (assuming the assigning of resources is allowed to be random)?
Thank you.