
Excel Add-in
Excel Add-in Overview
This page describes is the Clarizen Excel Add-in overview and includes the following sections :
- About The Clarizen Excel Add-in
- Viewing Permissions
- Technical Requirements
- Installing the Excel Add-in
- Uninstalling the Excel Add-in
About The Clarizen Excel Add-in
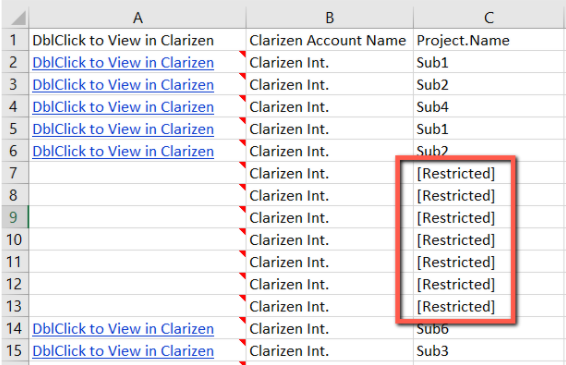
The Clarizen Excel Add-in is an advanced reporting tool designed to enable your organization the ability to extract raw Clarizen data in order to generate complex reports based on an enhanced Clarizen query and the MS Excel reporting capabilities. All query and report definitions are extracted and stored within the Excel spreadsheet, which can then be sent to end-users. Other users can run the same report on relevant data.
Viewing Permissions
Users can only view data that their permissions allow them to see.
In cases where the data cannot be displayed due to permissions, Restricted is displayed.
Technical Requirements
The Excel Add-in supports MS Excel 2007 and above.
.NET 3.5 Sp1 is required:
- Microsoft .NET 3.5 Sp1.
- For Windows XP Microsoft .NET 3.5 Sp1 may be installed by the SETUP.EXE installer (administrative permission may be required).
- For Windows 7 Microsoft .NET 3.5 Sp1 is already installed.
- For Windows 8 Microsoft .NET 3.5 Sp1 may need to be enabled via the Control Panel (administrative permission may be required).
Installing the Excel Add-in
- Click here for the Excel Add-in web page in Clarizen App Marketplace.
- Approve downloading and running of ‘setup.exe’.
Note: Your browser may prompt to approve running the setup.exe file or may not support running the file directly.
- Run the Setup.
- Close Excel and uninstall any previously installed versions.
- Run Setup directly from the download link (or save it to your disk and run it from there).
- When prompted, click Install .
The Excel Add-in is installed.
Using Clarizen Excel Add-in
Using Clarizen Excel Add-in
This page describes using the Clarizen Excel Add-in and includes the following sections :
- Logging In
- Creating a New Query or Editing an Existing Query
- Refreshing the Report
- Working with the Results
- Joining Queries
- Presenting Data
- Excel Function Tips
- Sample Reports
- Uploading Sample Reports
- Excel Add-in Change Log
- VBA Automation
- Video Demonstration
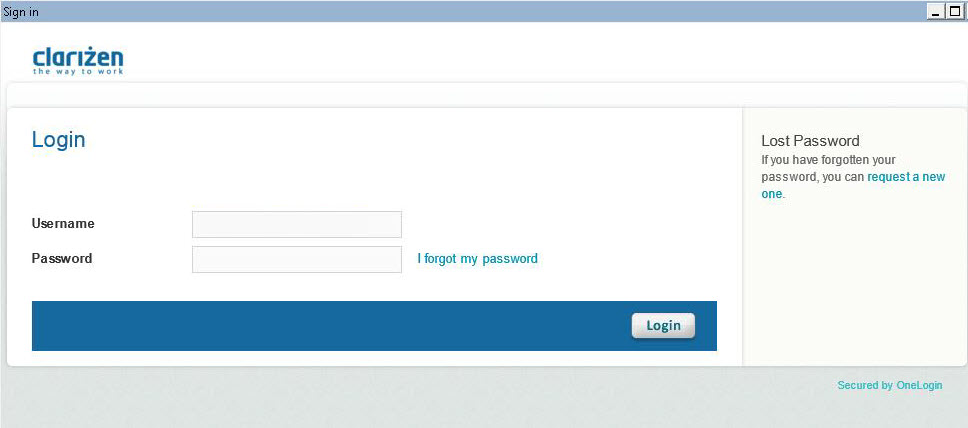
This section describes logging in to the Clarizen Excel Add-in using your Clarizen credentials.
- Open MS Excel and click the Clarizen ribbon.

Figure 1: Clarizen Ribbon
The Clarizen ribbon is active.
- Click Login .

Figure 2: Click Login
The Login with Clarizen credentials dialog opens.

- Enter your username and password.
- Ensure
 remains unchecked (unless logging in via SSO ).
 - Define the Global Login Settings options:
- Enable Multiple Accounts — For organizations using two or more Clarizen accounts intending to extract combined account data for reports.
- Click here for more on reporting from multiple accounts
- Remember my password for — Select a time duration for your credentials to be 'remembered'.
Your password is stored encrypted on your station only.
- Defining Credential Re-submission — Checking Re-enter credentials to view in Clarizen defines that the re-submission of credentials is required when opening a new web browser for viewing data within Clarizen.
- Proxy — Proxy server settings are taken from Internet Explorer settings automatically. Define your organization proxy server's settings only if you fail to login because of proxy issues.
- Click

Login commences.
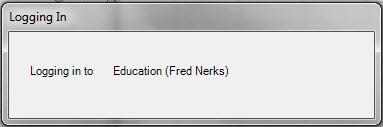
Figure 4: Logging In
The Excel sheet Clarizen ribbon displays your name.
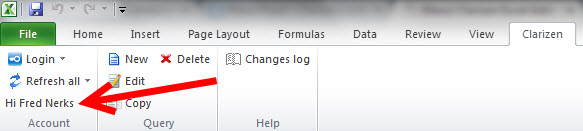
Figure 5: Logged In
Creating a New Query or Editing an Existing Query
- Click
 to create a new query based on Clarizen information.
A blank Query dialog opens.
OR
- Click
 to edit the query saved in the currently selected sheet.
OR
- Click
 for a copy of the query in the currently selected sheet.
The Query window opens.
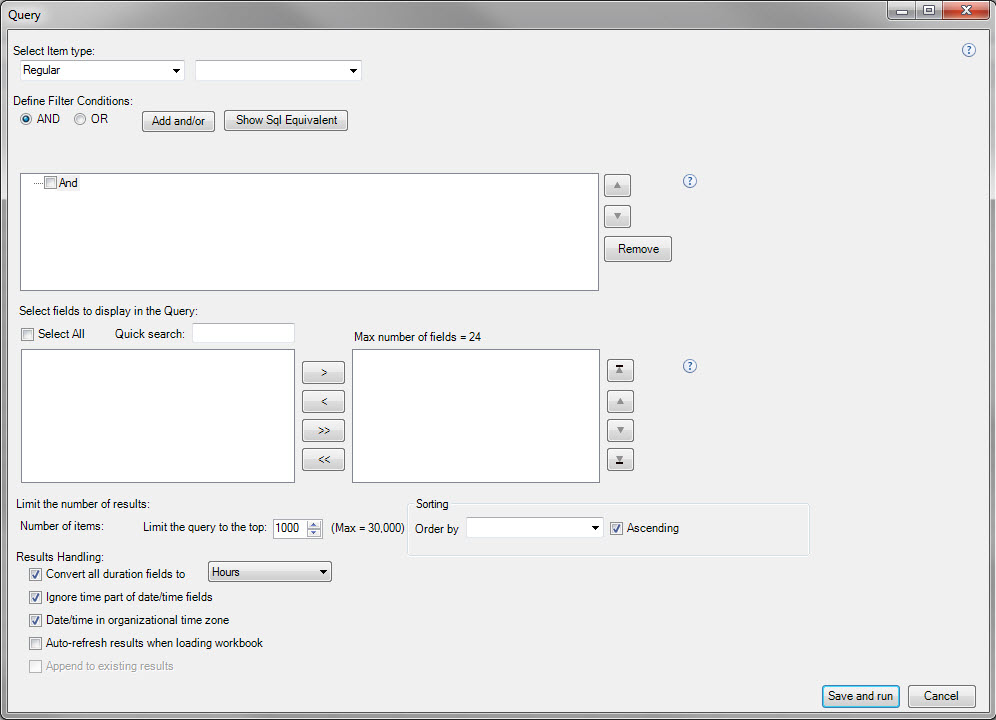
Figure 6: Blank Query Dialog
- From the drop-down menu, select an item type intended to query.
The three types include:
- Regular
- Link
- Pickup (pick-list)
- Click here for information on the Clarizen Data Model
The right-hand drop-down contains items relevant to the selected item type in the left-hand drop-down.
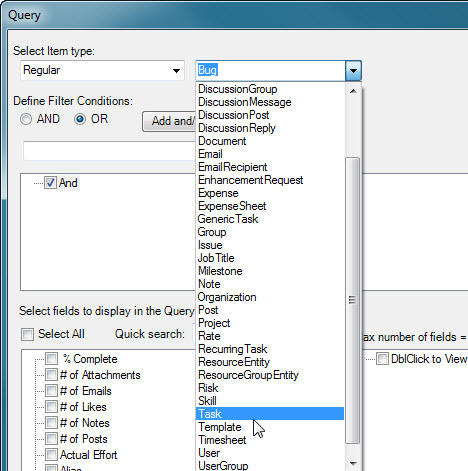
Figure 7: Select Item
- Combo fields support Autocomplete word prediction/completion.
- Nested items ( items with hierarchical sub items, indicated by '+') in Quick Search fields are supported by entering the period character to adjoin sub items.
- Nested fields cannot be used in the query for 'Sort By'
Recursive Query
A 'Recursive Query option is available (adjacent to the Item field) when selecting a work item item type (Milestone, Project, Task, or WorkItem) or when selecting Usergroup . When checked, this option serves as an extra filter that sets ‘has X as an ancestor in the hierarchy’.

Figure 8: Recursive Query
- Clicking
 following the initial selection changes the root item.
A recursive query can be useful for querying items within a hierarchical structure with several levels, such as a 'master' or 'portfolio' project. Other elements on the query form (including other filters) work the same way.
- Select items for the report:
a) The Clarizen Excel Add-in enables filtering items in various combinations of 'And'/'Or'. Click  to display a SQL like equivalent of the condition to confirm that report conditions are set as intended.
- 'And' is the default setting , to which criteria can be added
- For additional 'And'/'Or' nodes in the Select area, highlight the node you intend to add, select the filter
condition radio button and click
b) To define the filtering condition, highlight the 'And'/'Or' node you intend to add the condition under, and define a filter condition:
- Use the Quick search field to quickly find fields by their name.
- Select filtering condition
- Add the filter condition to the Select area
c) To remove or re-order (indent or outdent) filters, highlight the relevant filtering conditions in the Select area and click the relevant  button.
d) Run-time Filters: You can define filters to be available for users to modify at run-time, by checking the checkbox located adjacently to each criterion.
- Select fields for the report:
Clarizen Excel Add-in enables selecting up to 24 fields to show in the report. Fields can either be the direct attributes of a selected item type class or attributes of directly linked item types.
Relevant items show a ' DblClick to View in Clarizen' link that, once clicked, directs a new web browser to the item in Clarizen (suggested).
when opening a new web browser for viewing data within Clarizen.
You can reorder or remove fields.
a) Use the Quick search to quickly find fields by name. Please note that the list will also contain fields with the same name that are attributes of linked item types.
b) Check the checkbox of the fields to use on the left-hand side and click ![]() to move them across to the selected fields.
to move them across to the selected fields.
You can also double-click the field to move it across to the other side.
c) To remove or re-order (indent or outdent) fields, highlight the relevant fields in the Select area and
click the relevant  button.
d) Define the maximum number of results to be generated.
e) Use the 'Order by' field to sort the report.
f) Check or uncheck the Results Handling parameters:
- Convert all duration fields to (select Minutes , Hours , Days , Months )
- Ignore time part of date/time fields [Recommended]
- Date/time in organizational time zone [Recommended]
- Auto-refresh results when loading workbook
- Append to existing results
g) Click 
'New' and 'Copied' queries are presented in a new worksheet populated by the relevant results.
'Edited' queries update the existing (selected) worksheet and is populated by the relevant results.
The query definition is saved on that sheet.
- Click
 to refresh all the queries in the workbook, or
  to refresh the currently selected
worksheet with your current data.
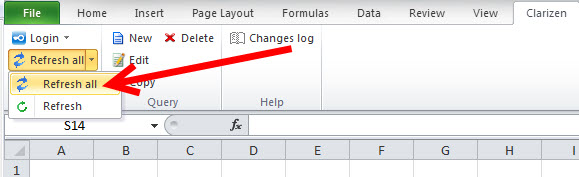
Figure 9: Refresh All
-
If runtime filters were set on the query, a Runtime Parameters form is shown. Select the filter intended to use from the list of filters available, and set the criteria.
-
Click
 after editing the filter. The number of items to be retrieved is updated.
 -
Click
 and receive the updated results from Clarizen. Workbook pivot tables and graphs update automatically.
Upon completion of defining a new query, a new Excel Worksheet is created with the name of the item type class that the query was defined on.
You may change the Worksheet name. The process to create more queries in the same Spreadsheet.
Each new Query is placed in a different Worksheet. As query results are over-written every time a query is run or refreshed, ensure to design reports on a separate Worksheet.
We recommended using MS Excel's VLOOKUP or INDEX and MATCH functions to join query results.
Use PivotTables to generate Graphs in Excel .
Tip 1: INDEX AND MATCH
VLOOKUP has limited capability as it requires the reference fields to be the left-most column and sorted.
INDEX and MATCH enables more flexibility and allows you to reference the data you extract from Clarizen without moving it around or worrying about its location on the Worksheet or the sort order.
Example of how it looks: =INDEX(Milestone!B:B,(MATCH(D6,Milestone!$F$1:$F$3000,0)))
Example of how it works: =INDEX(THE COLUMN FROM WHICH YOU WANT TO RETURN THE VALUE FROM, (MATCH(THE VALUE IN YOUR CURRENT WORKSHEET,THE COLUMN WHERE THAT VALUE IS IN THE TARGET WORKSHEET,0)))
Tip 2: ISNA
Sometimes your formula returns some good data and a load of NA’s resulting in a Excel which is difficult to read.
There’s an “ISNA” Excel function which you can use in an IF.
Example of how it looks:=IF(ISNA(MATCH(D6,Milestone!$F$1:$F$3000,0)),"-",INDEX(Milestone!B:B,(MATCH(D6,Milestone!$F$1:$F$3000,0))))

Basically, if the MATCH returns an NA value, then just show a “-“
Scroll down to the bottom of the page to download sample reports including these reports that users of the free Run-time version can use:
- Example of Timesheets Dashboard
- Sample of VLOOKUP use in a Projects hours reported this month Vs. % completed
To submit your own reports for free download from this site, please contact your Clarizen Customer Success Manager.
The Excel add-in supports the VBA automation object.
The automation object supports the following methods:
- DefaultLogin (silent as Boolean) as String – Logs in the user with the credentials saved by current user.
If the silent flag is false the Login form is shown. In this case the credentials are not saved or the saved credentials can’t log you in.
This method returns an empty string if no error occurs or an error message displays if an error occurred. - LoggedIn as Boolean – returns True if the Excel add-in is logged in or False if the Excel add in is not logged in.
- Login (user as string, password as string) as String– Logs in with the specified user name and password.
This method returns an empty string if no error occurs or an error message displays if an error occurred.
It is recommended that you protect the VBA project if you use this method to keep the credentials more secure. - RefreshAll (silent as Boolean) as String – Refreshes all queries on the workbook.
If silent is true then the message boxes are not displayed if one of the following conditions are true:- There are no queries on the workbook
- The query returns more results than specified on the query item.
- RefreshSheet (sheet as object) as String – Refreshes the query on a particular sheet (specified by a name or index).
This method returns an empty string if no error occurs or an error message displays if an error occurred. - RefreshCurrent () as String – Refreshes the query on the current selected sheet.
This method returns an empty string if an error occurs or an error message displays if an error occurred.
A sample document with the above VBA macros are available to see how the code works. Please click here to download it.
The video tutorial below demonstrates the following actions:
- Reviewing Requirements, Data Model, and Building Query
- Combining two queries using formulae and VLOOKUP
- Presenting your data in a pivot table and filtering or sorting as needed
Sample Report Tutorial – Building a simple Timesheet report with the Excel Add-in in under five minutes
Enabling Single-Sign-On for Excel Add-in
Enabling Single-Sign-On for Excel Add-in
This page describes configuring user accounts by your organization's Administrator in order to enable Single-Sign-On (SSO) for the Clarizen Excel Add-in.
Note: SSO for Excel add-in works with Active Directory Federation Services (AD FS) using the OATH configuration. SAML IDP is not supported.
- Navigate to Settings -> Extensions -> Connected Web Apps .
- Click Allow Access located adjacent to SSO for Excel Add-in.
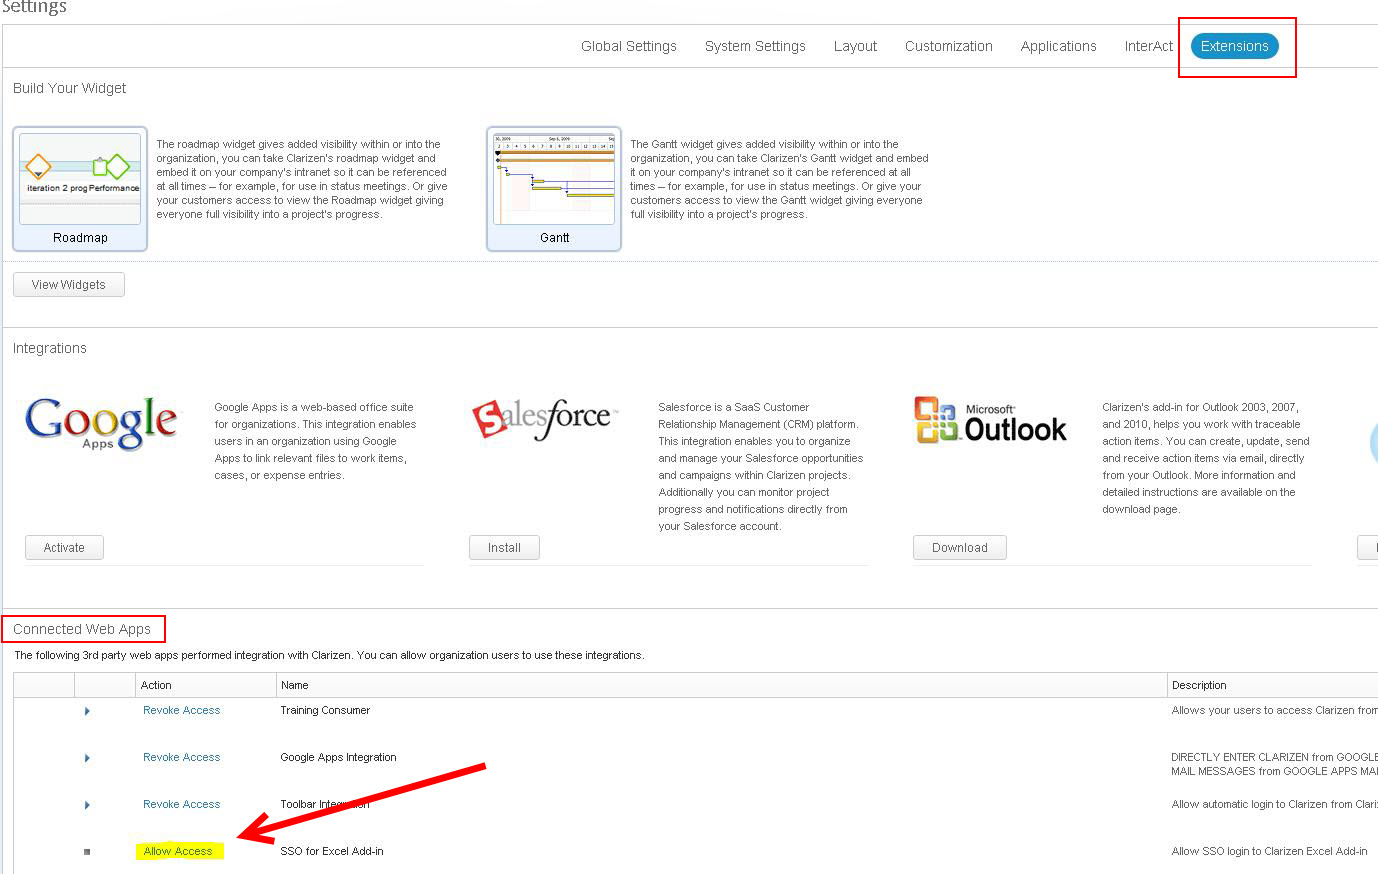
Figure 1: Allow Access
- Install the Clarizen application, located here, to set up a Custom Action (on the Organization level) to enable users to obtain the Organization ID number.
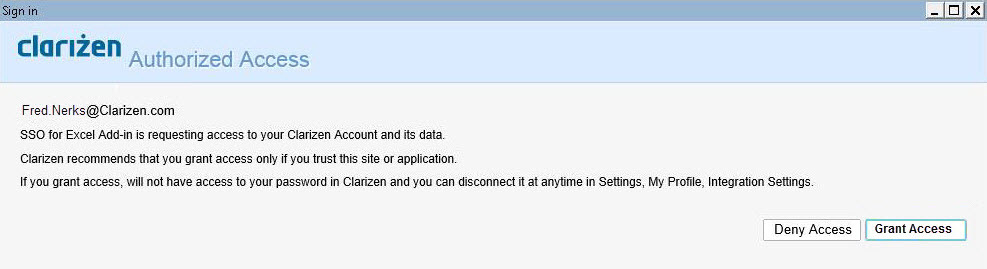
Logging in to Excel Add-in via Single-Sign-On
Logging in to Excel Add-in via Single-Sign-On
This page describes logging in to the Clarizen Excel Add-in via Federated Authentication Configuration Single-Sign-On (SSO).
1. Get your Organization SSO Login ID
You will need your organization ID for a 'once only' registration to log in to the Excel Add-in.
If you do not have your organization ID, you can contact your Customer Success Manager.
- Open MS Excel and click the Clarizen ribbon.

- Click Login.

The Login with Clarizen credentials dialog opens.
- Click the
 Federated Authentication link.
The Organization ID dialog opens.
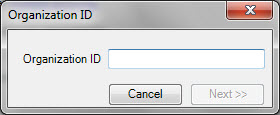
- Enter the Organization ID number.
- Click

- Enter your SSO credentials.
- Click

- Click
- Logging in commences.

The Excel ribbon updates with your details.

Reporting From Multiple Accounts
Reporting From Multiple Accounts
This page describes enabling Clarizen's Excel Add-in to extract data for reports from multiple Clarizen account s and includes the following sections :
About Reporting from Multiple Accounts
Should you intend to extract report data from two or more Clarizen accounts used by your organization, clicking the Enable multiple accounts link (located on the Login with Clarizen credentials dialog ) opens the Account Management form
on which you define and configure the accounts to use, specify the account report order and define a separate query for each account (providing that the accounts selected are of the same Clarizen item typ).
A special ‘Clarizen Account Name’ field can be added to the result fields to indicate which account the result(s) belongs to.
- Open MS Excel and click the Clarizen ribbon.

Figure 1: Clarizen Ribbon
The Clarizen ribbon is active.
- Click Login .

Figure 2: Login
The Login with Clarizen credentials dialog opens.

- Click the
 link .
The Manage Accounts form opens.
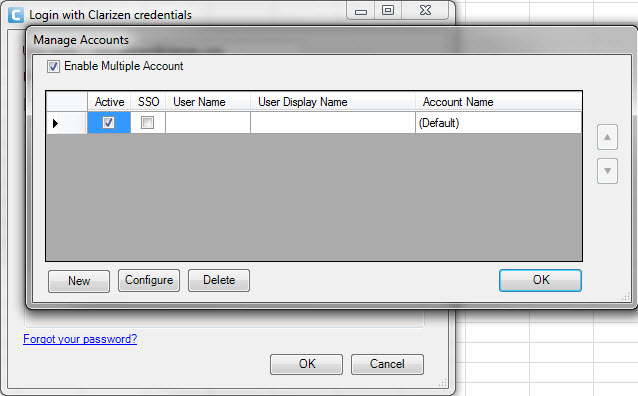
Figure 4: Manage Accounts Form
- Click

Another Login with Clarizen credentials dialog opens.
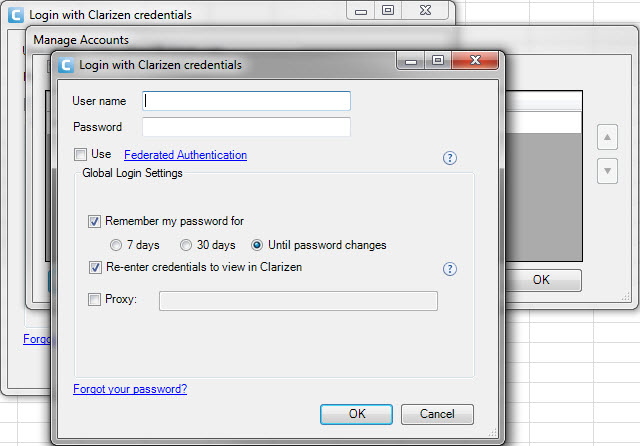
Figure 5: Enable First Account
- Enter credentials for the first account to the relevant fields.
- Configure duration for credentials to be 'remembered' settings and credential re-submission settings.
- Click

Login to the first account commences.
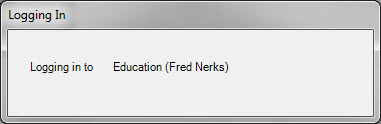
Figure 6: First Account Login
The Manage Account form updates with details of the enabled account.
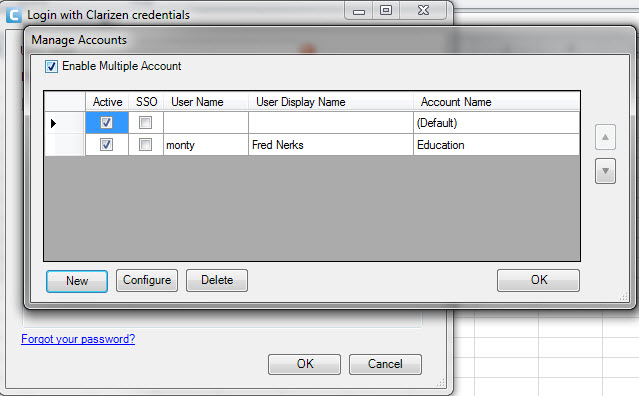
Figure 7: First Account Logged In
- Click

The Login with Clarizen credentials dialog opens again.

Figure 8: Enable Additional Account
-
Enter credentials for an additional Clarizen account (of the same item type) to the relevant login fields.
-
Click

- Login to the additional account commences.
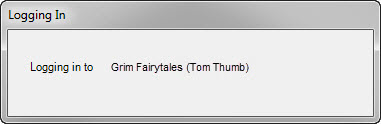
Figure 9: Additional Account Login
The Manage Account form updates with details of enabled accounts.
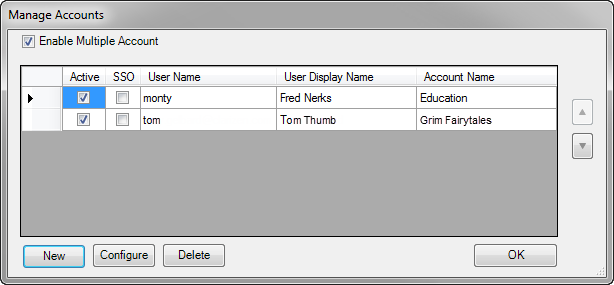
Figure 10: Two Accounts Logged In
- Continue as necessary to enable additional accounts in the same manner.
- Check/uncheck Active column checkboxes adjacent to the accounts to configure and/or extract data from.
- Click
 to sort report order.
 - Click

The Excel sheet opens. Multiple ( enabled) accounts are displayed. The Excel sheet's Clarizen ribbon displays the initial account holder's name.
- Perform Step 1 for creating a new query or editing an existing query as described in Using Clarizen Excel Add-in.
The Query window opens with enabled accounts listed (as sorted in Step 11 from the above procedure), the first account is selected.
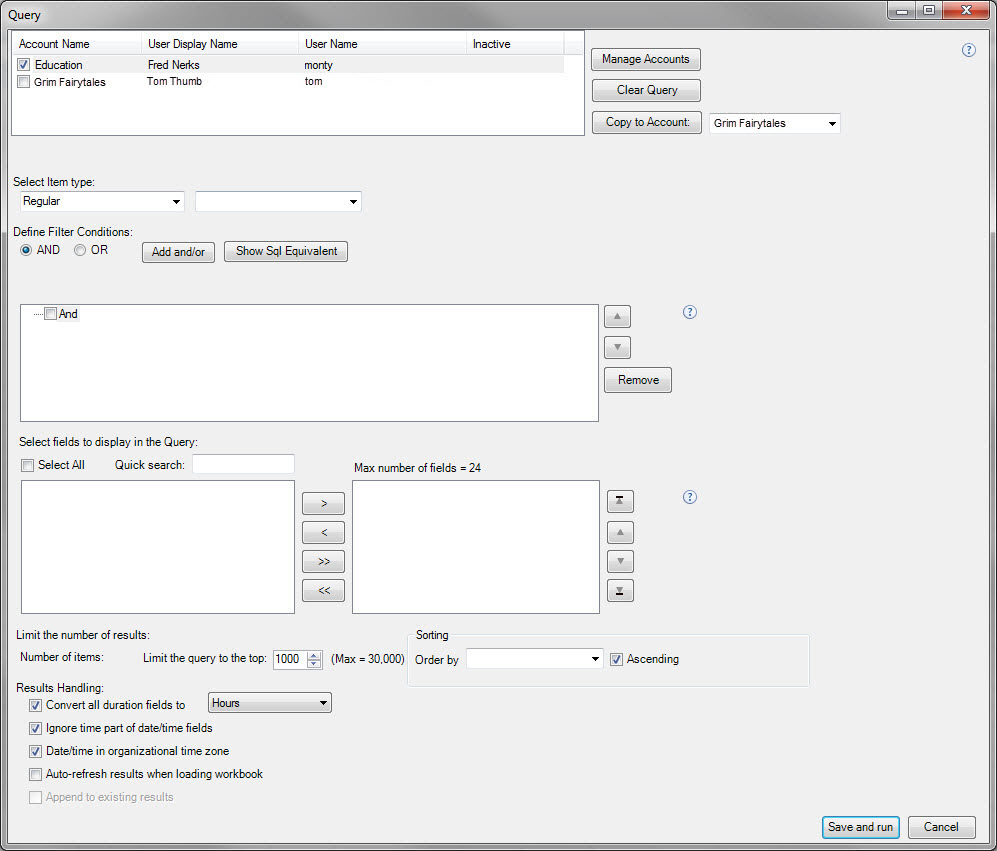
Figure 11: Multiple Accounts Enabled
- Clicking
 opens the Manage Account form .
 - Clicking
 clears the Query window data fields .
 - Clicking
 copies the current query data to the account selected in the adjacent drop-down menu.
- With the first account listed selected, configure the Query window as described in the steps for creating a new query or editing an existing query.
- Check the checkbox of the second account listed, and configure the Query window for data from that account.
- Continue in the same manner for additional accounts to be enabled, as required.
- Click

A new sheet is created and the relevant results are populated in it. The query definition is saved on that sheet.
Troubleshooting
I. Error message pops up when trying to install the “Developer” version:
Unable to install this application because an application with the same identity is already installed...
Complete the following steps:
-
Remove your existing plug-in.
- Open the Windows command line ( Start -> Run ).
- Run this command: rundll32 dfshim CleanOnlineAppCache.
- Re-install the developer version.
- Log in using your Clarizen credentials in the Excel document.
If the same error occurs, try this:
- Ensure Excel is closed.
- Browse (type this on the address bar of windows explorer, or 'Start+Run' ) to this directory on your computer: %localappdata%\Apps\2.0
- Delete everything under this directory (it's just a cache). If some files are used and cannot be deleted, you'll have to log off Windows.
- When the directory is empty retry the installation.
II. No error messages are shown but the 'Clarizen' tab does not show up in the menu bar after the installation.
Complete the following steps:
- Go to File -> Options -> Add-ins
- Select 'Disabled Items' on the combo on the lower part of the form and click Go .
- Select 'Clarizen Excel Add-in' and click Enable .
- Exit Options and restart Excel .
If it wasn't shown in the disabled items then check the Inactive items:
- Go to File -> Options -> Add-ins
- Select Com Add-ins on the combo on the lower part of the form and click Go .
- Check 'Clarizen Excel Add-in' and click OK .
- III. If the 'Clarizen' tab is still not shown in the menu bar but 'Clarizen Excel Add-in' does appear in the File -> Options -> Add-ins -> Active Application Add-ins:
Complete the following step:
- Open Excel Options .
- Click Customize Ribbon .
- Click Reset .
- Select Reset all Customizations .
- Click OK .
- Check if the Clarizen tab is shown in the menu bar.
Comments